DHART
Loading...
Searching...
No Matches
Reading an Imported Mesh within Unity

Previous Tutorial: Reading a Mesh From Unity

Intro

In this tutorial we'll be using the project created in the first tutorial: Project Setup, and we'll be using concepts and code covered in the previous guides.

In this guide we will cover:

  • Assigning a nested game object containing a mesh from an imported file or prefab
  • Combining meshes within Unity
  • Transforming meshes between Unity and DHART coordinates

The majority of this tutorial is specific to Unity, and is mostly about converting the mesh data from Unity into a format understandable by DHART.

Scene Setup

In the previous tutorial we showed how to use a mesh from within Unity. Due to the wide-ranging file imports and settings for Unity, there are a few important requirements to understand when trying to use a prefab or object that was imported from Unity.

The first requirement is to enable the Read/Write attribute of the imported file by selecting the model in the Assets browser and going to the Inspector as shown in the following image:

Import Settings

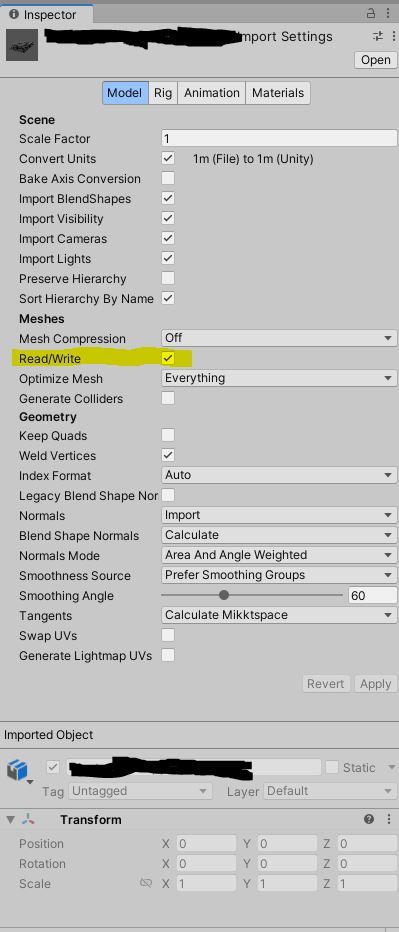
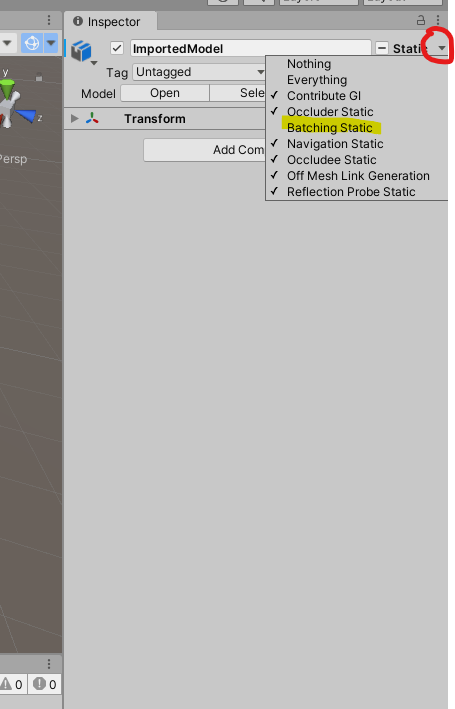
For a similar reason (accessing vertices in Unity scripts), under the inspector for the model, the Batching Static must not be selected. The object does not need to be static, but if it is, this particular attribute cannot be used.

Batching Static

Helper Functions

There are a few functions we have written to help parse Unity-specific data that are not included in DHART (since they are specific to Unity).

  • Create a C# script called MeshUtils.cs
  • Copy and paste the code below into this script.
using System.Collections.Generic;
using UnityEngine;
using UnityEngine.Rendering;
public static class MeshUtils
{
public static Mesh CombineSubmeshes(Mesh mesh, Matrix4x4 matrix)
{
List<CombineInstance> ci = new List<CombineInstance>();
for (int i = 0; i < mesh.subMeshCount; i++)
{
CombineInstance combine = new CombineInstance();
combine.mesh = mesh;
combine.transform = matrix;
combine.subMeshIndex = i;
ci.Add(combine);
}
Mesh out_mesh = new Mesh();
out_mesh.indexFormat = IndexFormat.UInt32;
out_mesh.CombineMeshes(ci.ToArray(), true, true);
out_mesh.name = mesh.name;
return out_mesh;
}
public static Mesh[] GetMeshesFromParent(GameObject MeshParent)
{
// Get the meshrenders from the parent
var mesh_renders = MeshParent.GetComponentsInChildren<MeshFilter>();
List<Mesh> out_meshes = new List<Mesh>();
// Get the transforms and renderer for each mesh
foreach (var filter in mesh_renders){
out_meshes.Add(MeshUtils.CombineSubmeshes(filter.mesh, filter.transform.localToWorldMatrix));
}
return out_meshes.ToArray();
}
public static float[] FlattenVertArray(Vector3[] inds, bool convert_coord = false)
{
float[] return_array = new float[inds.Length * 3];
for (int i = 0; i < inds.Length; i++)
{
int os = i * 3;
if (convert_coord)
{
return_array[os] = -1 * inds[i].x;
return_array[os + 1] = -1 * inds[i].z;
return_array[os + 2] = inds[i].y;
}
else
{
return_array[os] = inds[i].x;
return_array[os + 1] = inds[i].y;
return_array[os + 2] = inds[i].z;
}
}
return return_array;
}
}

In summary there are two main functions that we use, FlattenVertArray and GetMeshesFromParent. The first function has an option to convert the coordinates from Unity to DHART defaults, which we will use in the next section.

Loading the Mesh for DHART

Now you will create another script called DHART_BVH.cs.

This script will have a public facing variable than can be set in the Unity Editor. With the included references, the script starts with:

Script Setup

using DHARTAPI;
using System.Linq;
using UnityEngine;
public class DHART_BVH : MonoBehaviour
{
EmbreeBVH BVH; // a BVH
public GameObject MeshParent;
// Start is called before the first frame update
void Start()
{
A Bounding Volume Hierarchy for the EmbreeRaytracer.
Definition: EmbreeBVH.cs:31
Manipulate and load geometry from disk.
Definition: CommonRotations.cs:4
Cast rays to determine if and where they intersect geometry.
Definition: EmbreeBVH.cs:7
Automated analysis of the built environent
Definition: CommonTypes.cs:9

Next, within Start(), we will set the mesh to active, use our helper function for getting meshes under this parent:

MeshParent.SetActive(true);
// Get every mesh from this parent
var inputMeshes = MeshUtils.GetMeshesFromParent(MeshParent);

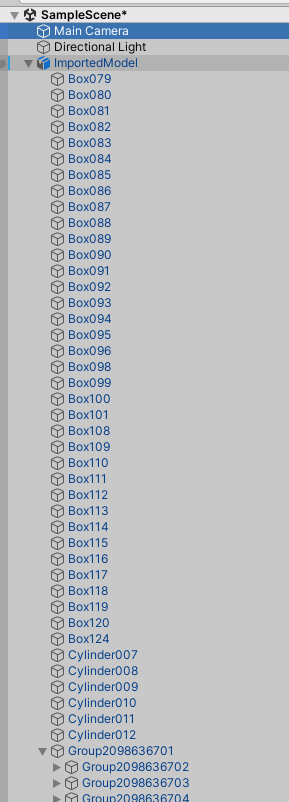
Note that this function is mostly used for nested objects, meaning that instead of a single mesh game object, we have a list of objects under a game object and we want to include all of them.

Batching Static

Now that we have a list of all the meshes, we iterate through each mesh, extract the triangles (vertex indices), get a vertex array with converted coordinates (using our helper function), and finally make a MeshInfo object of that data.

Mesh Extraction

MeshInfo[] Meshes = new MeshInfo[inputMeshes.Length];
for (int i = 0; i < Meshes.Length; i++)
{
// Get the triangles, verts, and name of mesh
var tris = inputMeshes[i].triangles;
var vert_array = MeshUtils.FlattenVertArray(inputMeshes[i].vertices, true);
var mesh_name = inputMeshes[i].name;
// Make sure there are vertices in this mesh
if (vert_array.Length > 0) {
Meshes[i] = new MeshInfo(tris, vert_array, mesh_name);
}
}
A collection of vertices and indices representing geometry.
Definition: MeshInfo.cs:50
string name
Name of the mesh.
Definition: MeshInfo.cs:52

The line that checks if (vert_array.Length > 0) is IMPORTANT!. We must remove any meshes that do not have vertices. A simple way to do this at the end of the mesh conversion process is to remove the null values of the array (the indices we skipped).

// Remove null meshes
Meshes = Meshes.Where(c => c != null).ToArray();

Passing an invalid mesh to the BVH is a likely cause of crashes.

Mesh Parsing

The only real function that we need is this.BVH = new EmbreeBVH(walkableMesh);. However, we also show some nice helper functions to structure your project. For example, in this script we demonstrate how to check for a specific string name in the meshes (for example, if you had a naming convention), and remove the meshes that are not of interest.

// Filter BVHs using substring matching and some set logic.
MeshInfo[] Doors = Meshes.Where(mesh => (mesh.name.ToLower().Contains("door"))).ToArray();
MeshInfo[] Windows = Meshes.Where(mesh => (mesh.name.ToLower().Contains("window"))).ToArray();
MeshInfo[] Global = Meshes.Except(Doors).Except(Windows).ToArray();
var walkableMesh = Global.Union(Doors).ToArray();
// Make sure the final mesh exists
if (walkableMesh.Length > 0) {
this.BVH = new EmbreeBVH(walkableMesh);
}

Testing BVH

Finally, we run a quick test to make sure our BVH was properly loaded. This example uses (0,0,1) and (0,0,-1) as the coordinates, but you should use any values that you know will be hit by a ray.

// Cast a Ray in a known direction (will depend on your mesh)
Vector3D origin = new Vector3D(0, 0, 1);
Vector3D direction = new Vector3D(0, 0, -1);
// Cast ray and get the distance/MeshID
RayResult result = EmbreeRaytracer.IntersectForDistance(this.BVH, origin, direction);
// Print the distance/MeshID
Debug.Log(result);
Cast rays with Intel's Embree raytracing library.
Definition: EmbreeRayTracer.cs:41
static RayResult IntersectForDistance(EmbreeBVH bvh, Vector3D origin, Vector3D direction, float max_distance=-1)
Cast a single ray and get the distance to its hit and the meshID if it hit anything.
MeshID and Distance for a casted ray.
Definition: RayResultStructs.cs:20
A three dimensional vector with built in utility functions.
Definition: CommonTypes.cs:40

and of course, don't forget to close the Class and Start() functions.

}
}

Assigning the Mesh and Running

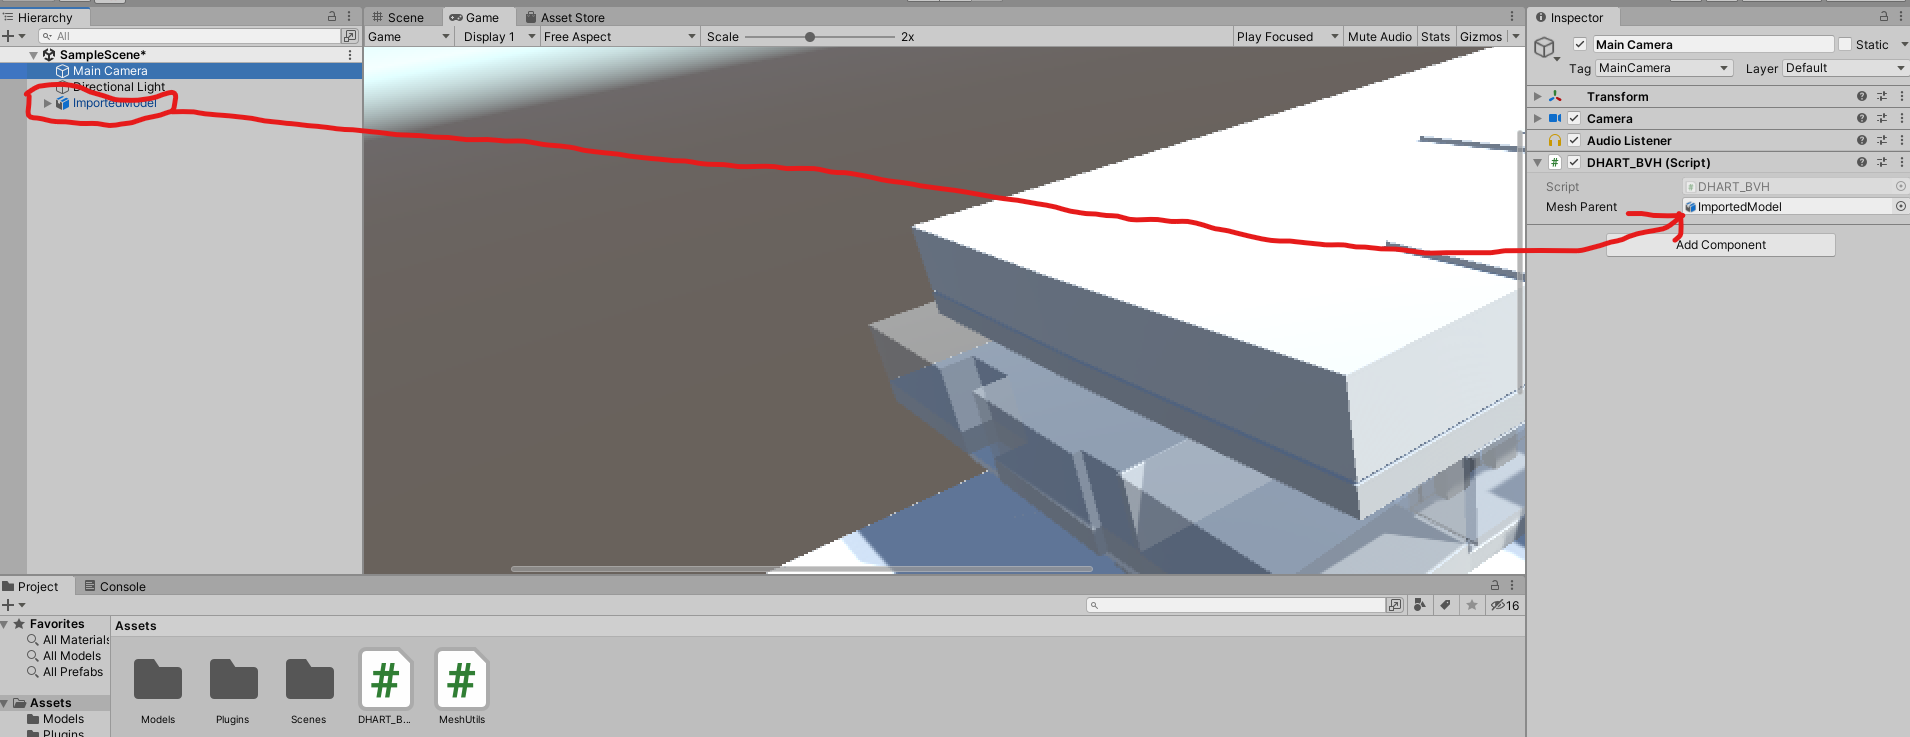
The final step is to save the file, go back into the editor, click and drag the DHART_BVH script onto the Main Camera (you could also make an empty game object, but this is easier).

Assigning Script

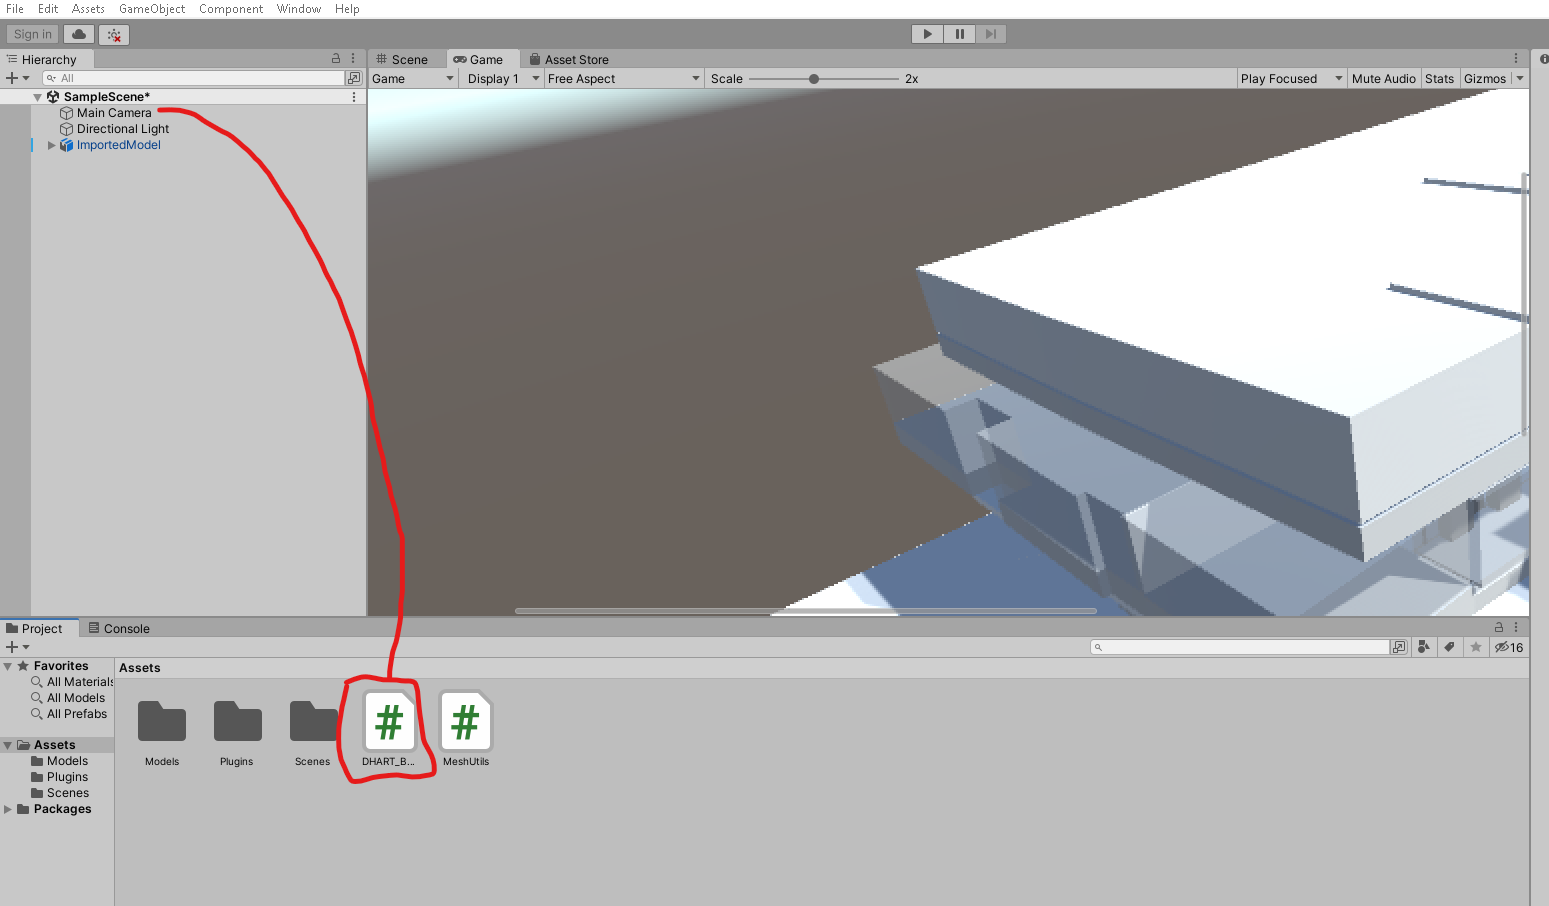
Once the script is attached to the game object, click the game object (Main Camera in this case). In the inspector you should see the Mesh Parent that was created in our script. Without changing the selection, click and drag the mesh from the scene hierarchy to the Mesh Parent, as shown in the image.

Assigning Model

And, thats its. You should be able to press play and the distance and mesh id should be displayed on the console.