Table of Contents
Intro
In this tutorial we will cover the process of creating a new Visual Studio project that references the DHARTAPI C# interface. We will also walk through the steps of adding non-C# dependencies such as DHARTAPI.dll to your project, as this is required for the produced program to run at all. After this tutorial is completed you should have a project that is able to reference DHARTAPI' C# interface and automatically copy it and its dependencies to the output folder when the project is built.
Please note that you will need to download a plane.obj file from the repositories example models in order to run the project.
Prerequisites
Ensure that you have the following prerequisites before continuing.
- The latest copy of the C# DHART Release
- A copy of Visual Studio. Version should not matter, but for this tutorial I will be using VisualStudio 2019
- The necessary prerequisites for developing C# projects in Visual Studio.
Creating the project
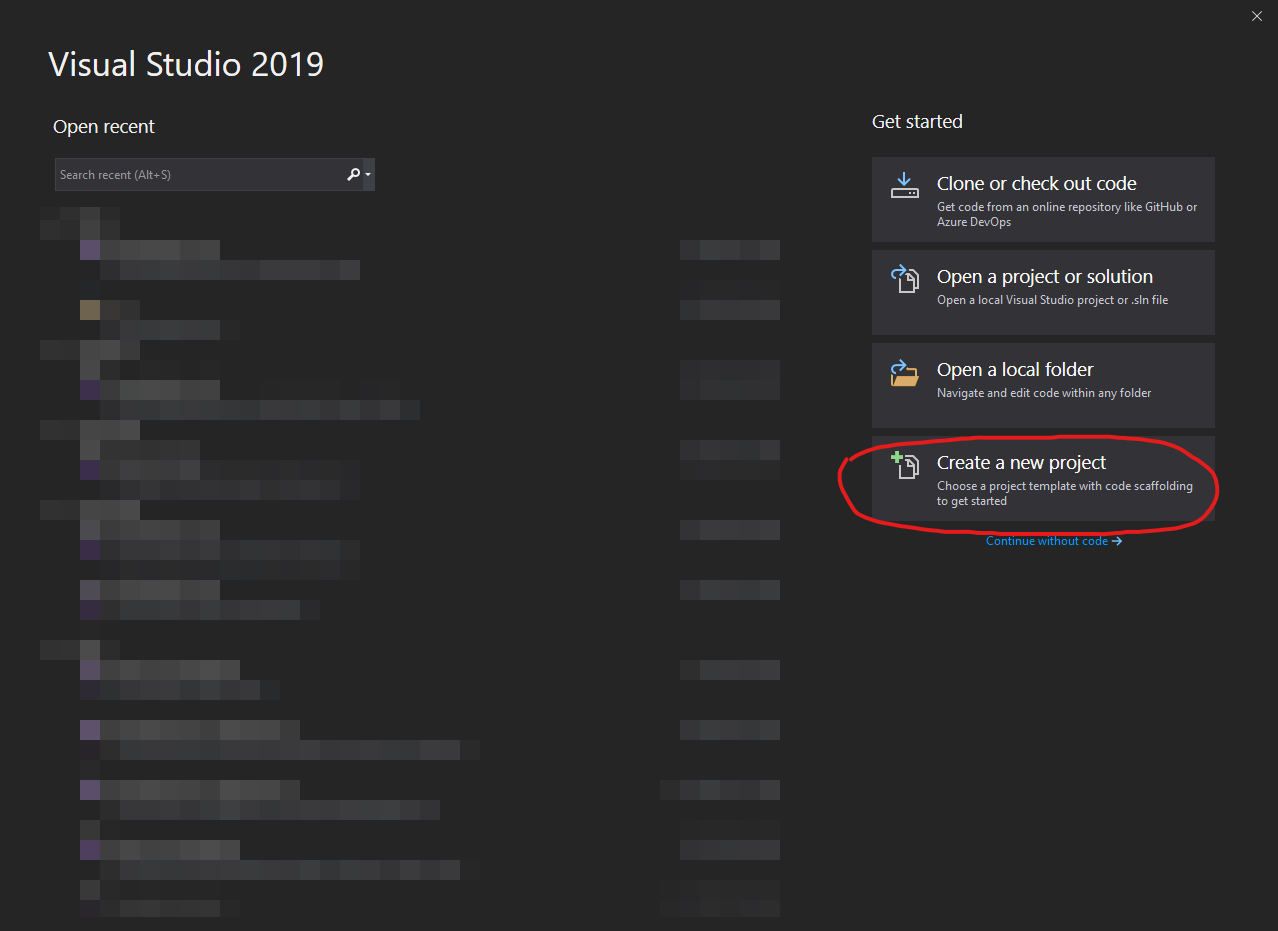
Figure 1.1: Visual studio splash screen. Circled: Create a new project button
First, Open Visual Studio. You should be greeted by the splash screen shown in Figure 1.1 or a similar screen if you're using a different version of Visual Studio. Click on the button titled Create a New Project to create a new project.
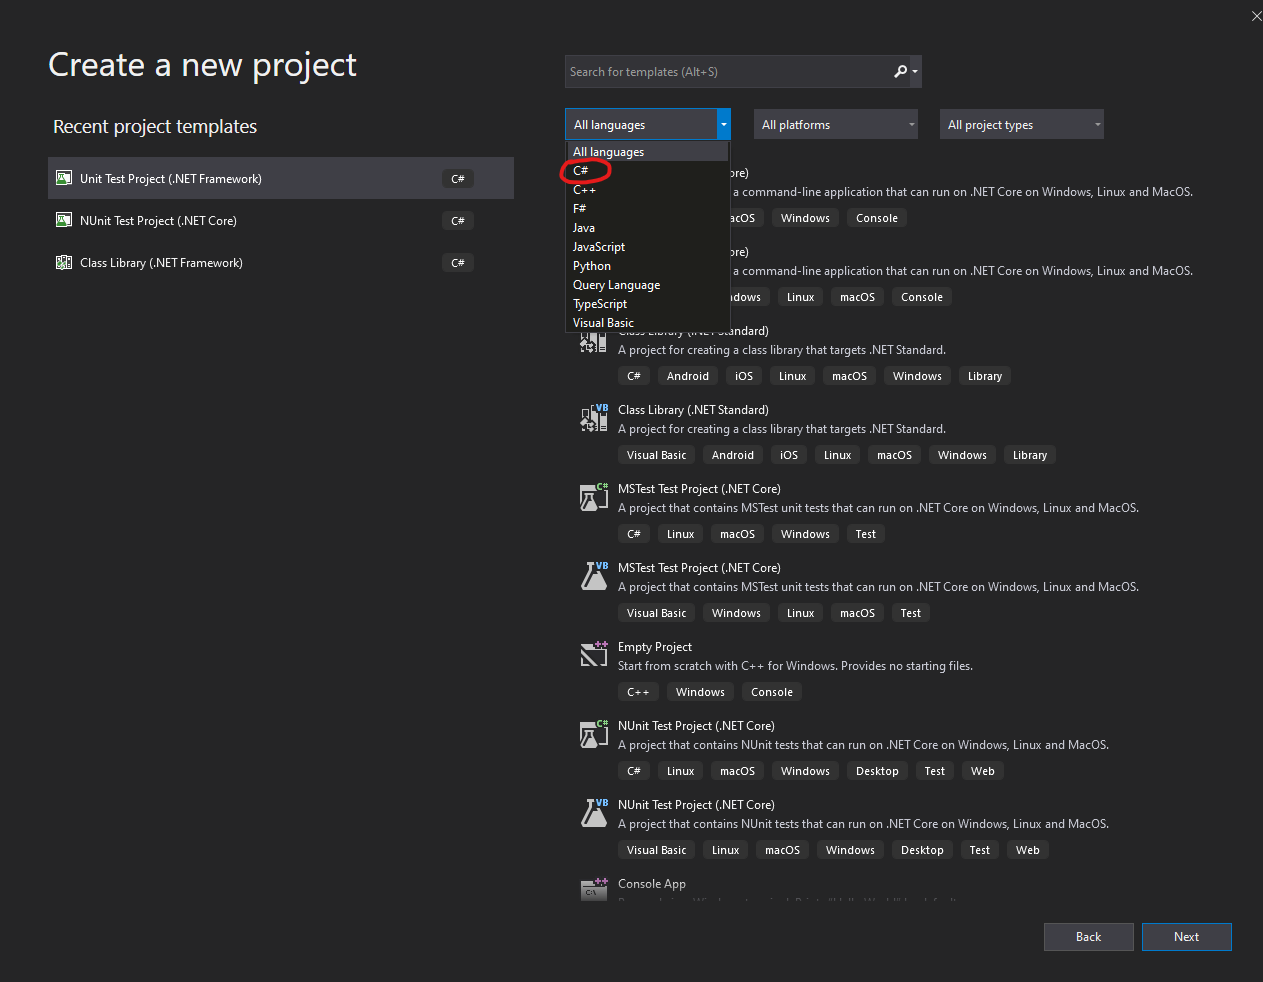
Figure 1.2: Create A New Project Menu
Upon clicking Create A New Project you should see the create a new project dialog line in . Note that the menu options shown here may be different than yours depending on what Visual Studio extensions you have installed. We want to create a new C# Library, so we want to filter these options to only include options for C#. Click on the All Languages drop down, then select C# as shown in Figure 1.2.
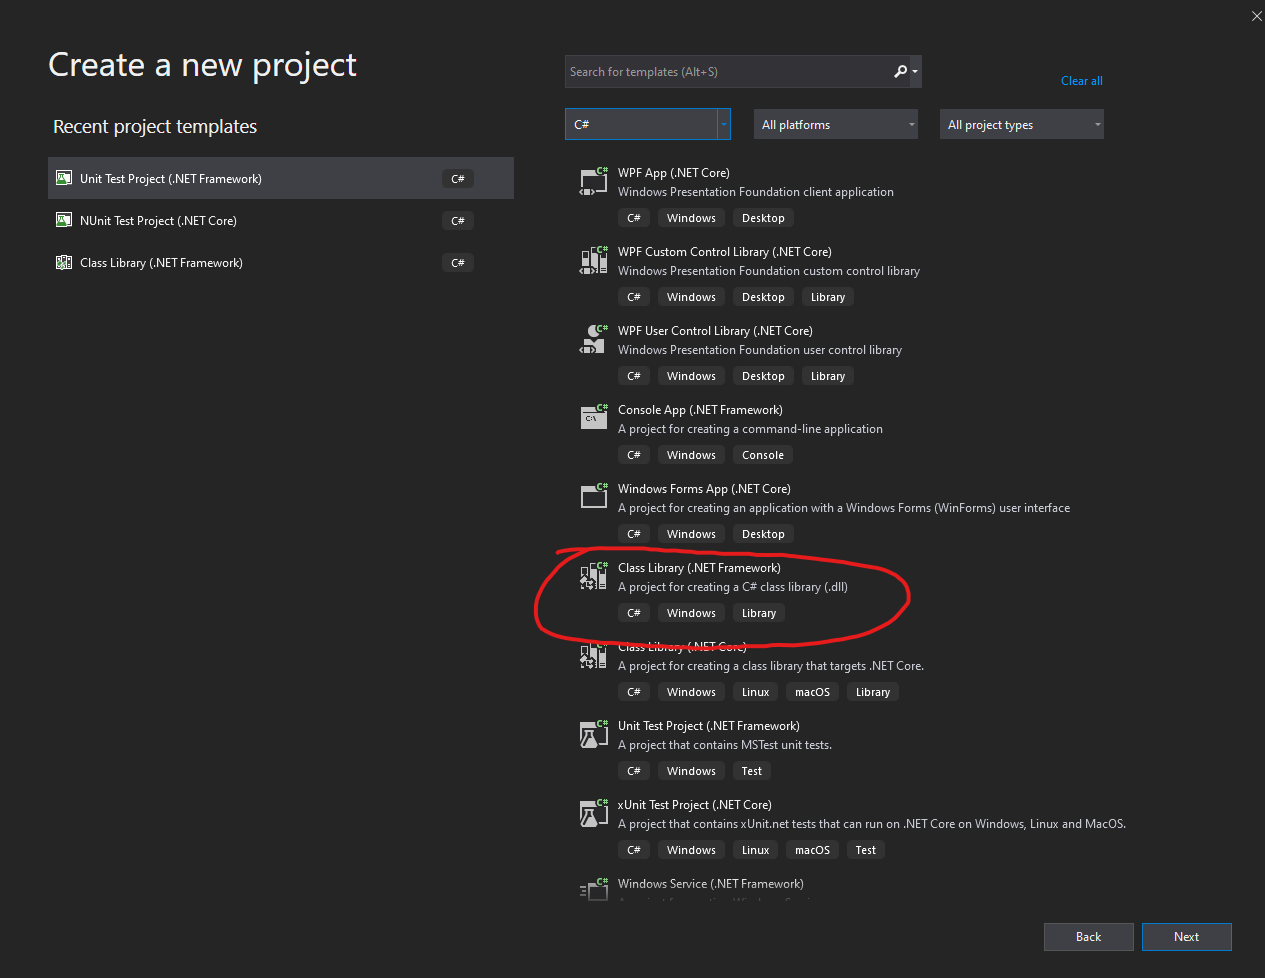
Figure 1.3: Create a .NET Class Library
Once you've clicked C# the menu should be filtered to only contain C# project types. Just as before, your list may not exactly match the one shown here depending on the Visual Studio extensions you have installed. The one we're looking for is the Class Library (.Net Framework) circled in Figure 1.3. If you do not see this option, scroll up or down to find it. Click Class Library (.Net Framework) to create the project.
NOTE: The processes described in this tutorial, will also work with other types of projects such as command line projects, or other executables. Feel free to use one of these other types of projects instead for this tutorial.

Figure 1.4: ConFigure Dialog
In the conFigure dialog, you're able to change the name, location and framework version of your assembly. For this demonstration we'll be using the version of the .net framework that DHARTAPICSharp was built with, Framework version 4.5. Change the framework version to 4.5 (or whatever version your project was built for, possibly in the release notes if you download from github) by using the dropdown menu circled in cyan in Figure 1.4. We'll be leaving the rest of the options as their defaults for this example, but feel free to change the name and location of the project. Once you're ready, click the Create button circled in red at the bottom right corner of the dialog to create the project.
Figure 1.5: Blank Project
After pressing create, Visual Studio display a window for your new blank project. Now we're ready to move on to adding the DLL.
Adding A Reference To DHART
Before we move on to writing the example program, we must first add DHARTAPI C# DLL as a reference.
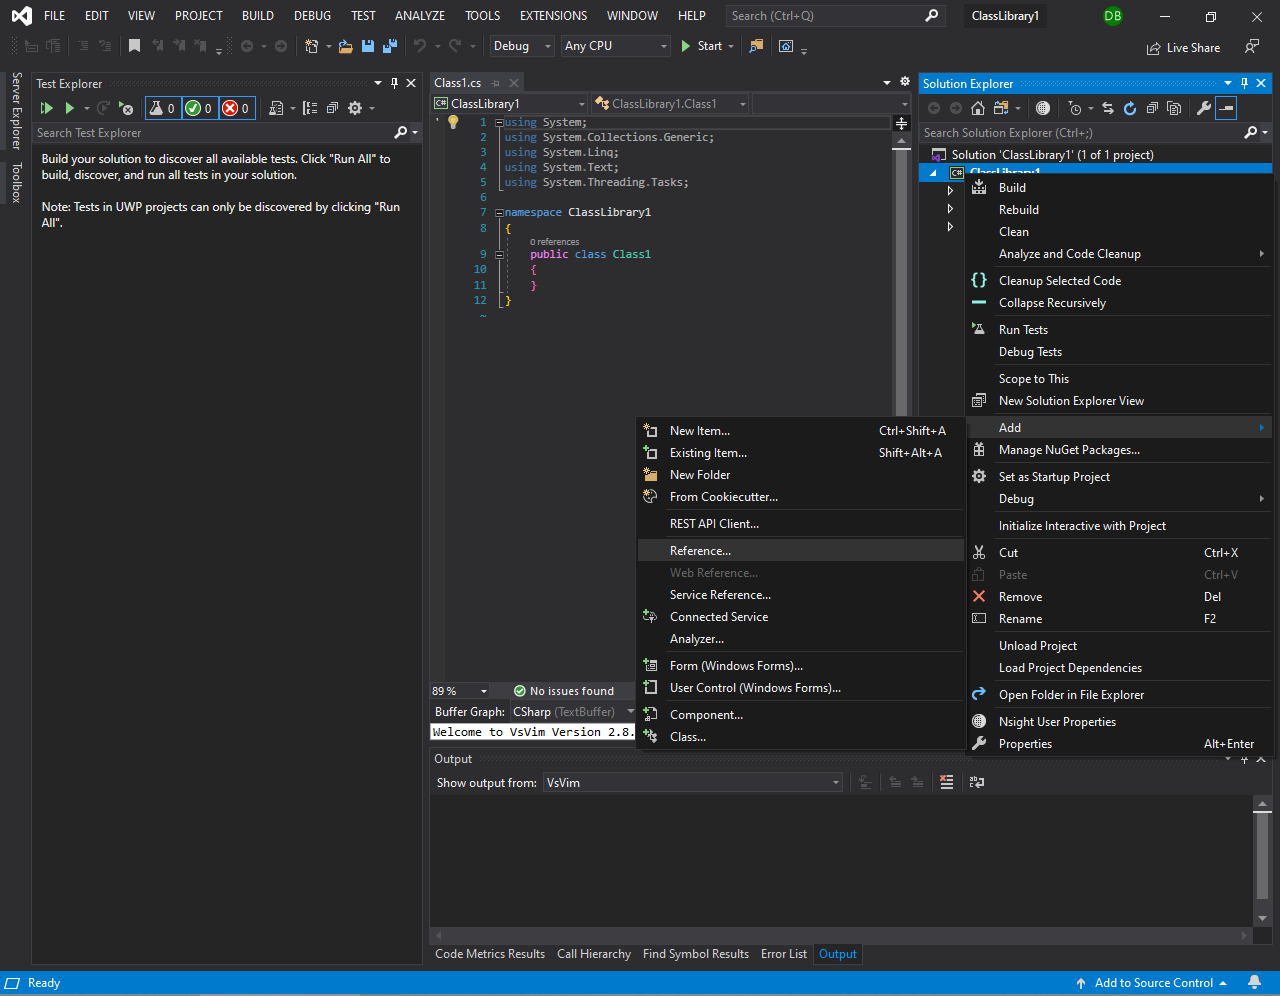
Figure 2.1: Menu to add a reference
In the Solution Explorer on the right hand side of the window, right click on the item with the name of your current solution, hover over the Add option, then click Reference as shown in Figure 2.1.
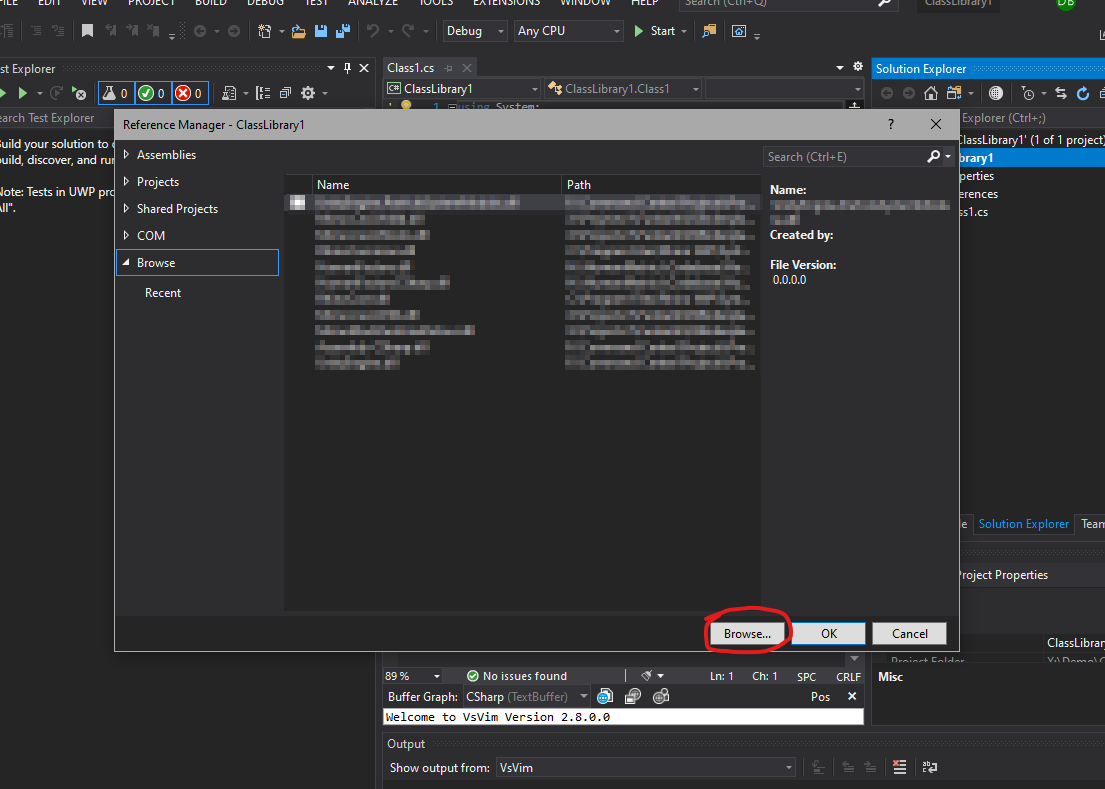
Figure 2.2: Add Reference Dialog
A new window should open similar to the one shown in Figure 2.2, however the contents of the window will differ depending on what other C# projects you have previously built with Visual Studio, or DLLs you've previously added references to in the past. Click the Browse button circled in red in Figure 2.2 at the bottom right corner of the dialog. This should open a file explorer window.

Figure 2.3: DHART Bin Folder
In the file explorer, navigate to the bin directory in which you've installed DHART. Select all the files in the bin directory, then click the add button at the bottom right of the window to add them to the menu.
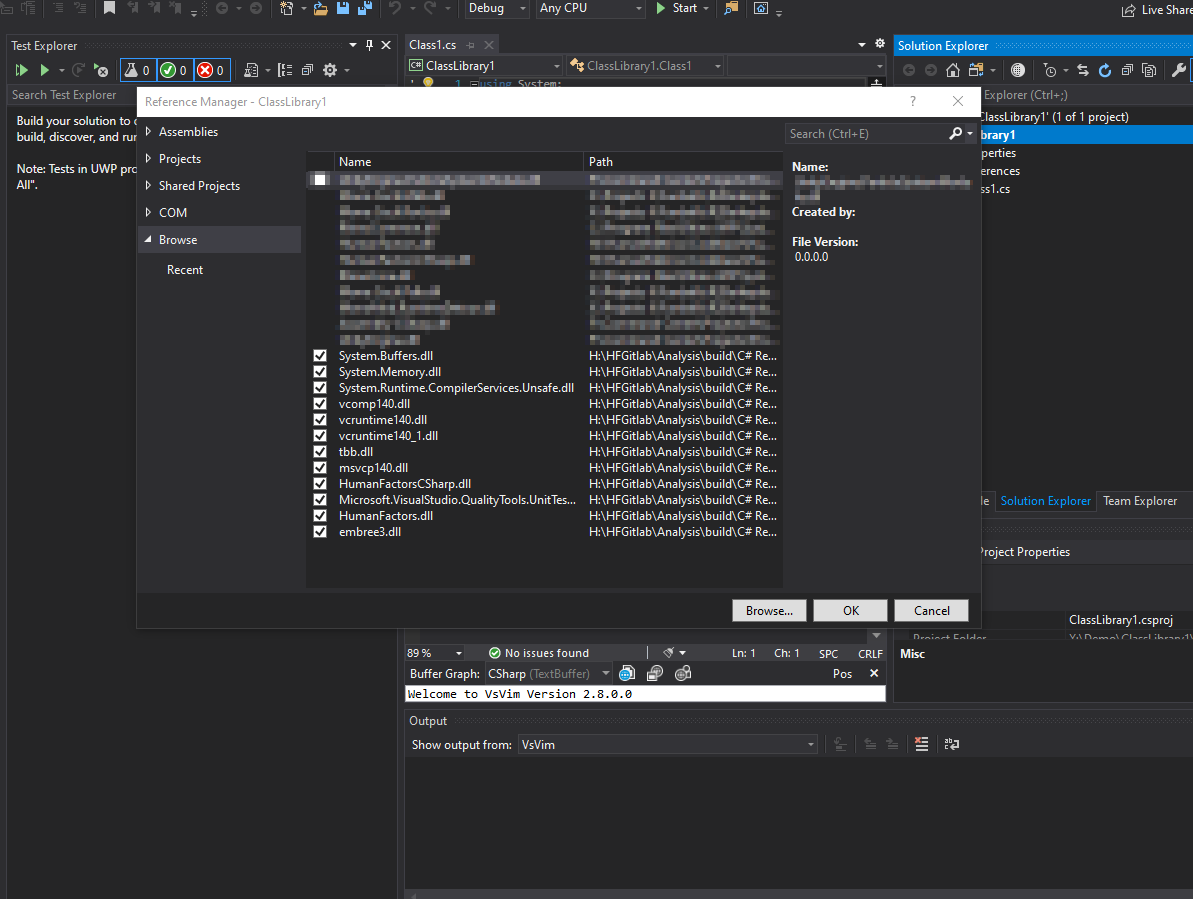
Figure 2.4: References added to the solution, indicated by a checkbox
If you completed the last step successfully, then you should be able to see all of the added DLLS checked off in the Reference Manager like in Figure 2.4. From this list, only some of the items are C# DLLs, so only leave the deselect every one of the references except for DHARTAPICSharp.dll, System.Memory.dll, System.Runtime.CompilerServices.Unsafe.dll, and System.Buffers.dll.
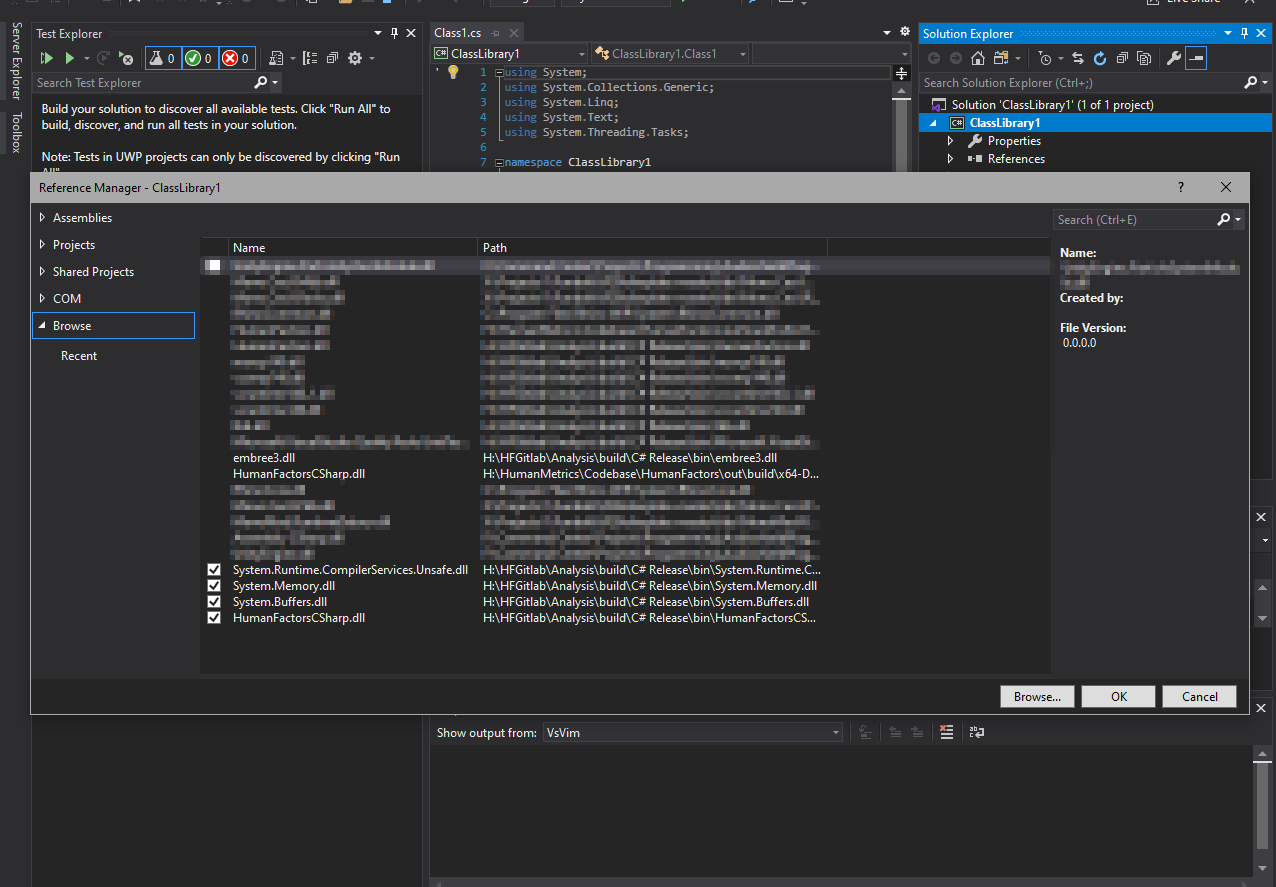
Figure 2.5: Only required references checked off
Once you've unchecked the unneeded references, you can finish the process of add these references to the project by clicking the add button at the bottom right of the reference manager window. This will close the window and bring you back to your blank project.
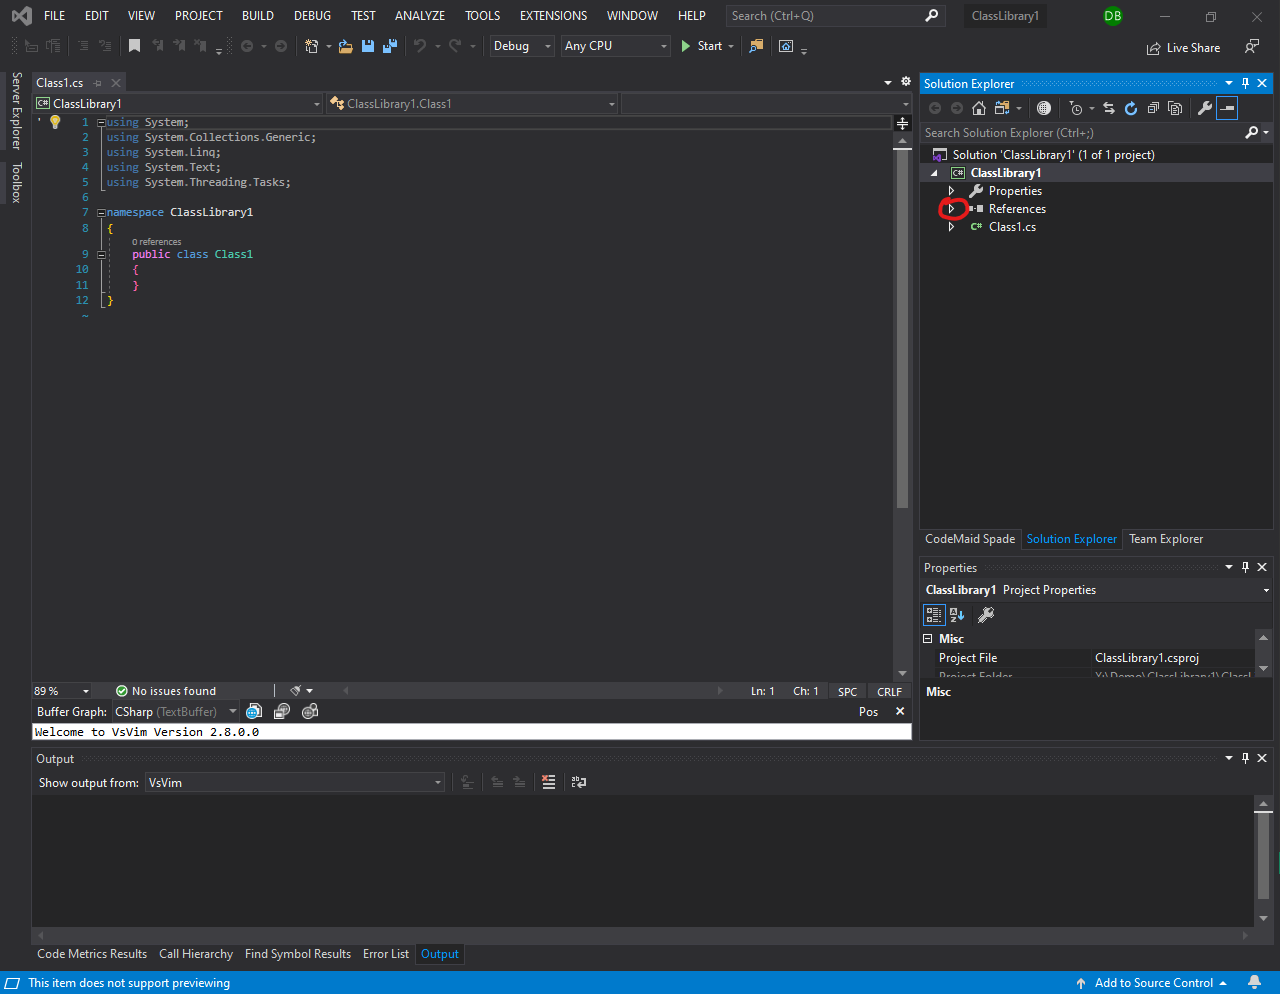
Figure 2.6: References Tab Circled
For additional verification that this worked, click the dropdown arrow in the solution explorer next to References, circled in red in Figure 2.6.
If you do not see the references under the ClassLibrary1 group, and they are instead directly under Solution, you should select the references and drag them into the ClassLibrary References.
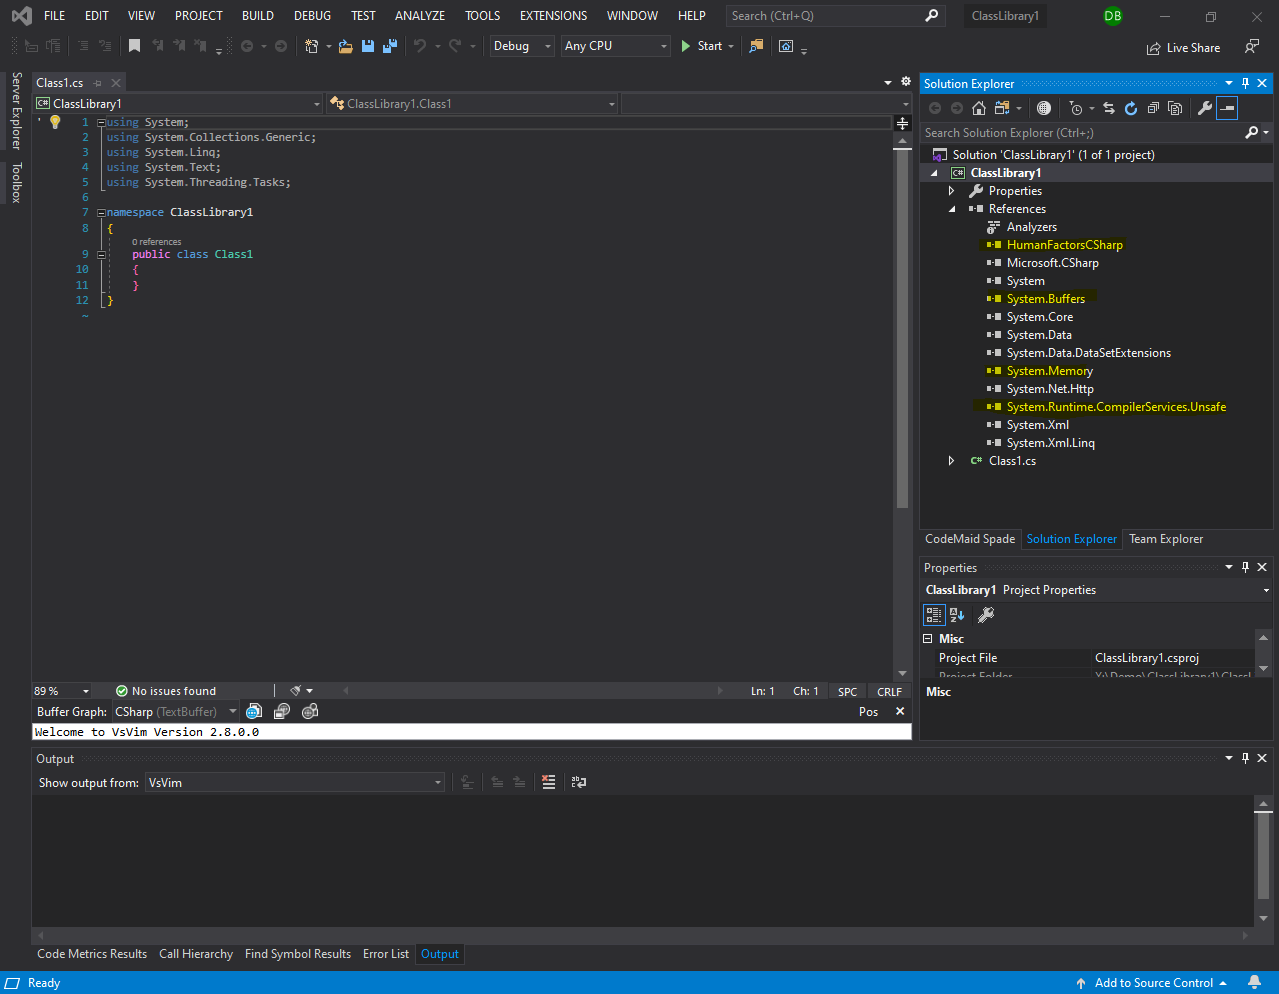
Figure 2.7: New References in dropdown.
Upon clicking this drop down, all of the references to this project will be displayed. In this list you should be able to see the references we added earlier. These references are highlighted in Figure 2.7. If you can see these references in the list, then you have completed this step correctly, and are ready to move onto the next step of this tutorial.
Adding Native Dependencies
We added the C# components of human factors to the project as libraries, however we also need to ensure that those DLLs that we unchecked are part of our project as well. While these libraries can't be loaded as dependencies like C# libraries can, they can still be managed by our project, and most importantly copied to the correct directories when the project is built. If the native libraries are not placed alongside the C# library, then DHARTAPI will not run once the project is built.
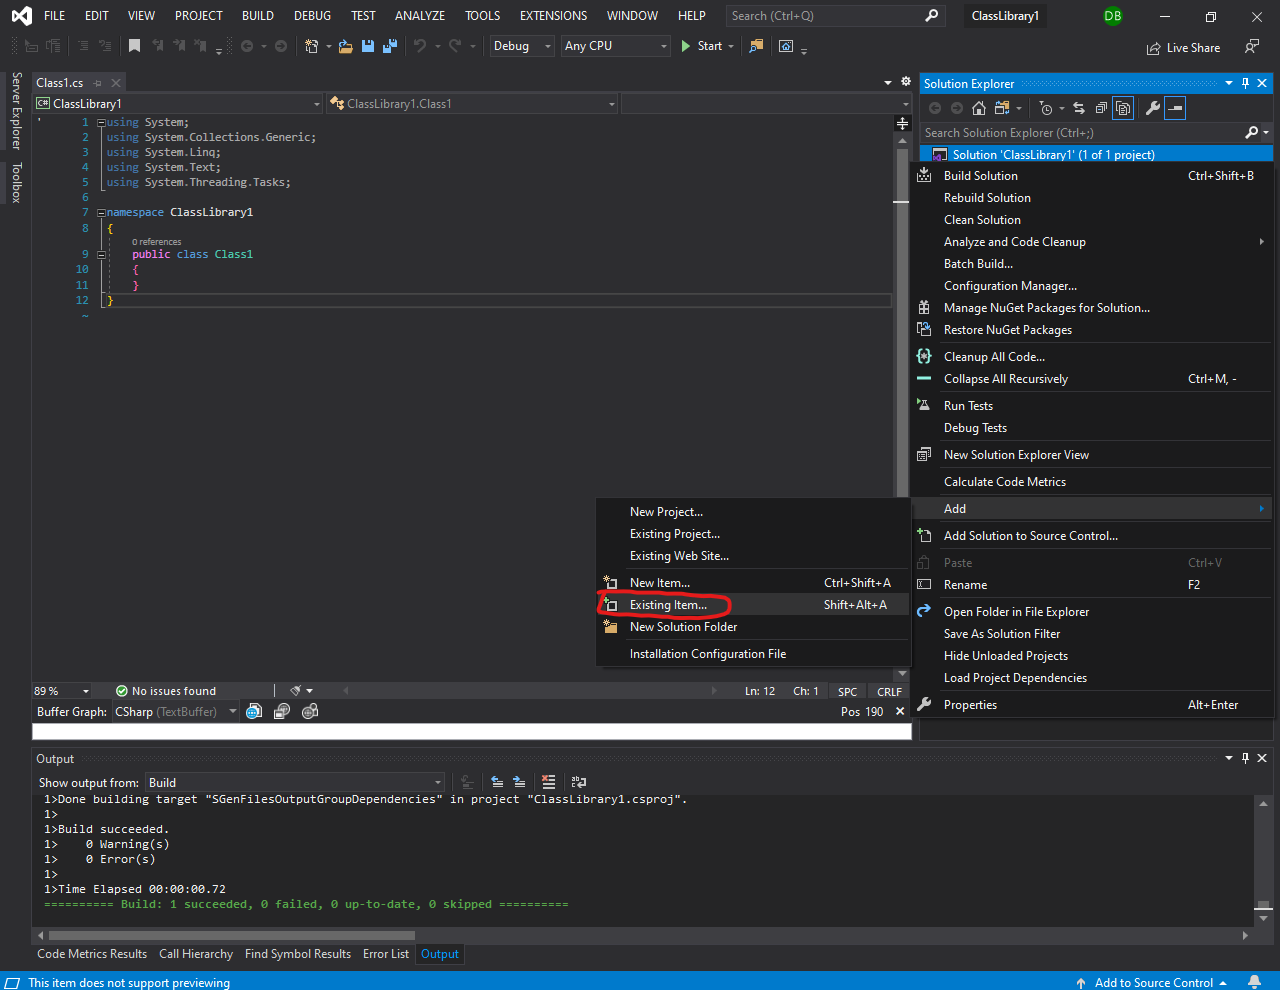
Figure 3.1: Add Existing Item in Dropdown
To add a file to your project, right click on the project in the solution explorer window, then hover over add and click Existing Item as shown in Figure 3.1.
Upon clicking on the Add existing item option another file explorer window will open. Navigate back to the bin directory of DHART_API.

Figure 3.2: Circled: All Files option
Upon reaching the folder you may notice the folder is now empty. like in Figure 3.2 This is because by default, Visual Studio only displays visual C# files in this dialog. To see other file types, you must click the drop down at the bottom right of the window above the Add button and select All Files (*.*) circled in red.
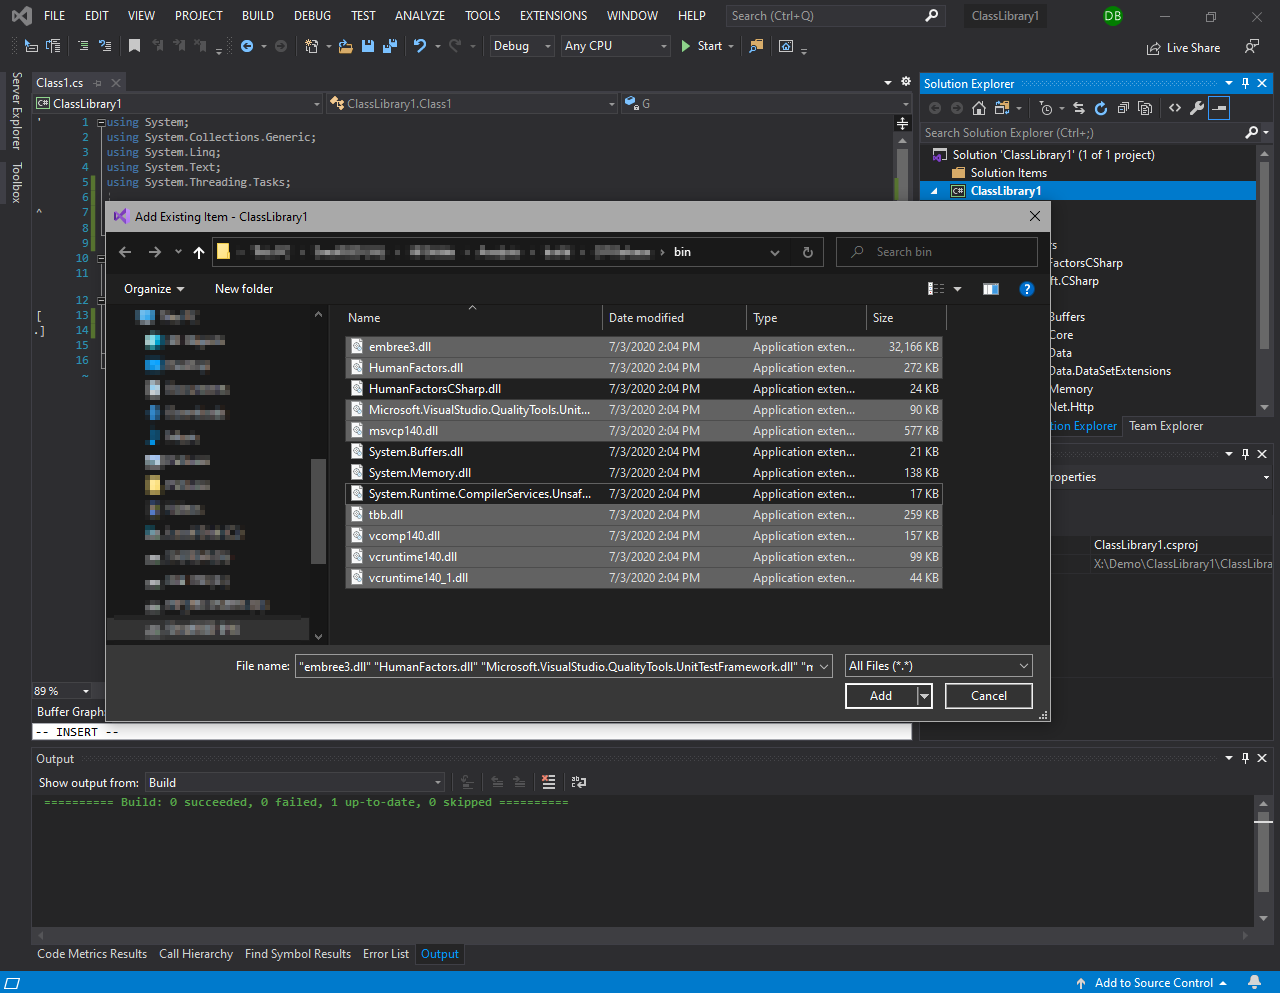
Figure 3.3: Highlighted: Native DLLs to add to the project
This should disable the default filetype filter and allow you to see the DLLS like in Figure 3.3. Highlight all of the native DLLS that we didn't leave checked off in the previous section. These are highlighted in Figure 3.2. Once these are selected, press the Add button at the bottom right of the window to add them to the project.
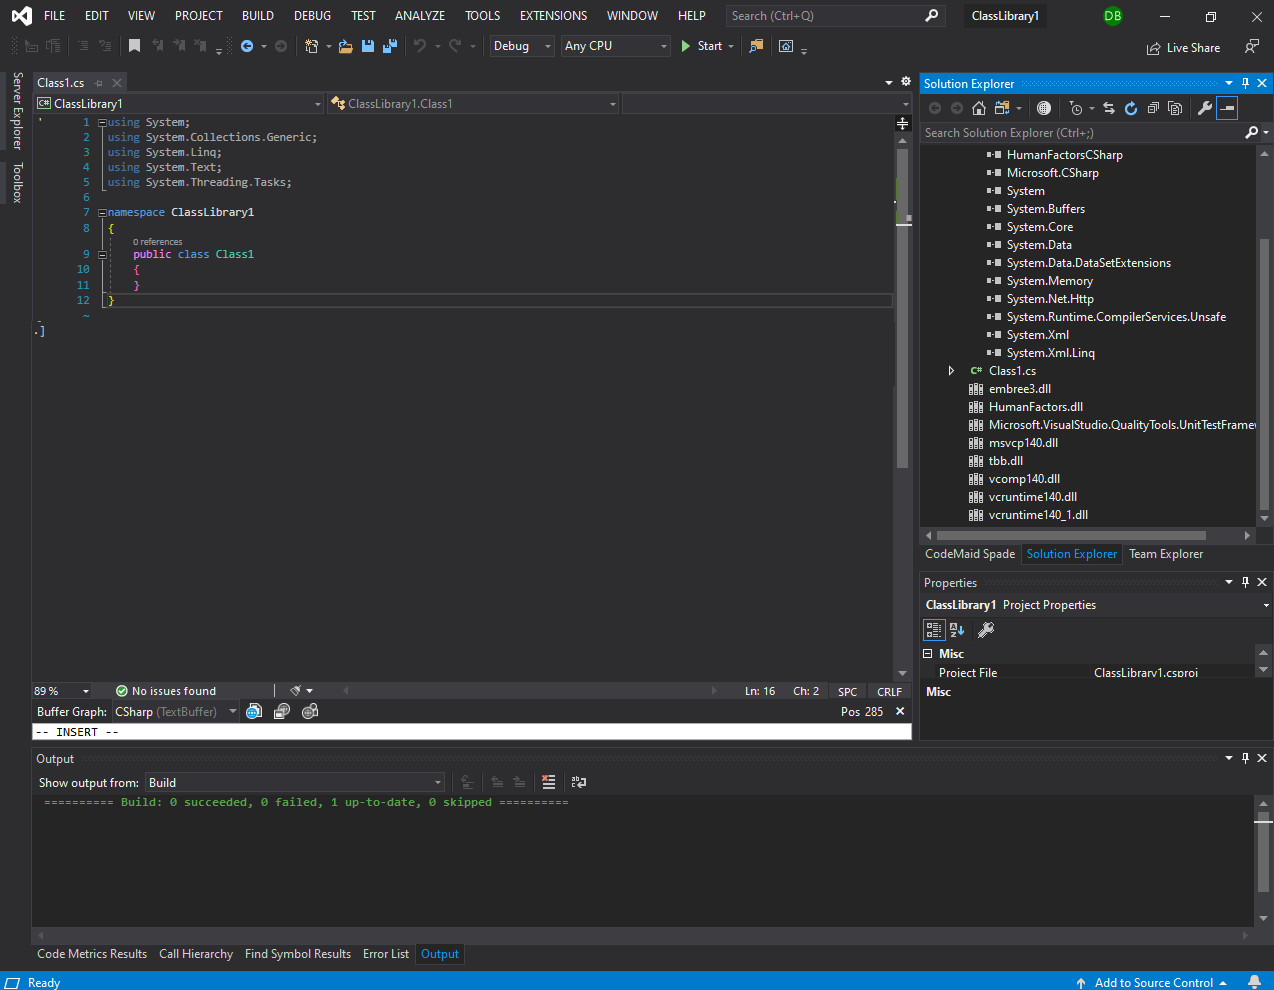
Figure 3.4: Highlighted: Native DLLS
After the file explorer closes, go to the solution explorer and scroll down until you see the newly added DLLS highlighted in Figure 3.4.
Figure 3.5: Highlighted: Native DLLS in the project
Select all of these DLLS and right click on them then click Properties circled in red in Figure 3.5. This may not have an immediately visible effect, like in the case of my Visual Studio configuration here. If you, like me, have the properties pane, resize it by dragging it's border upwards. The position of this pane will differ between versions of Visual Studio and personal preferences.

Figure 3.6: Properties Pane
Once the properties pane is visible (outlined in cyan in Figure 3.6) click on the item that says Do not copy, circled in red in the properties window.
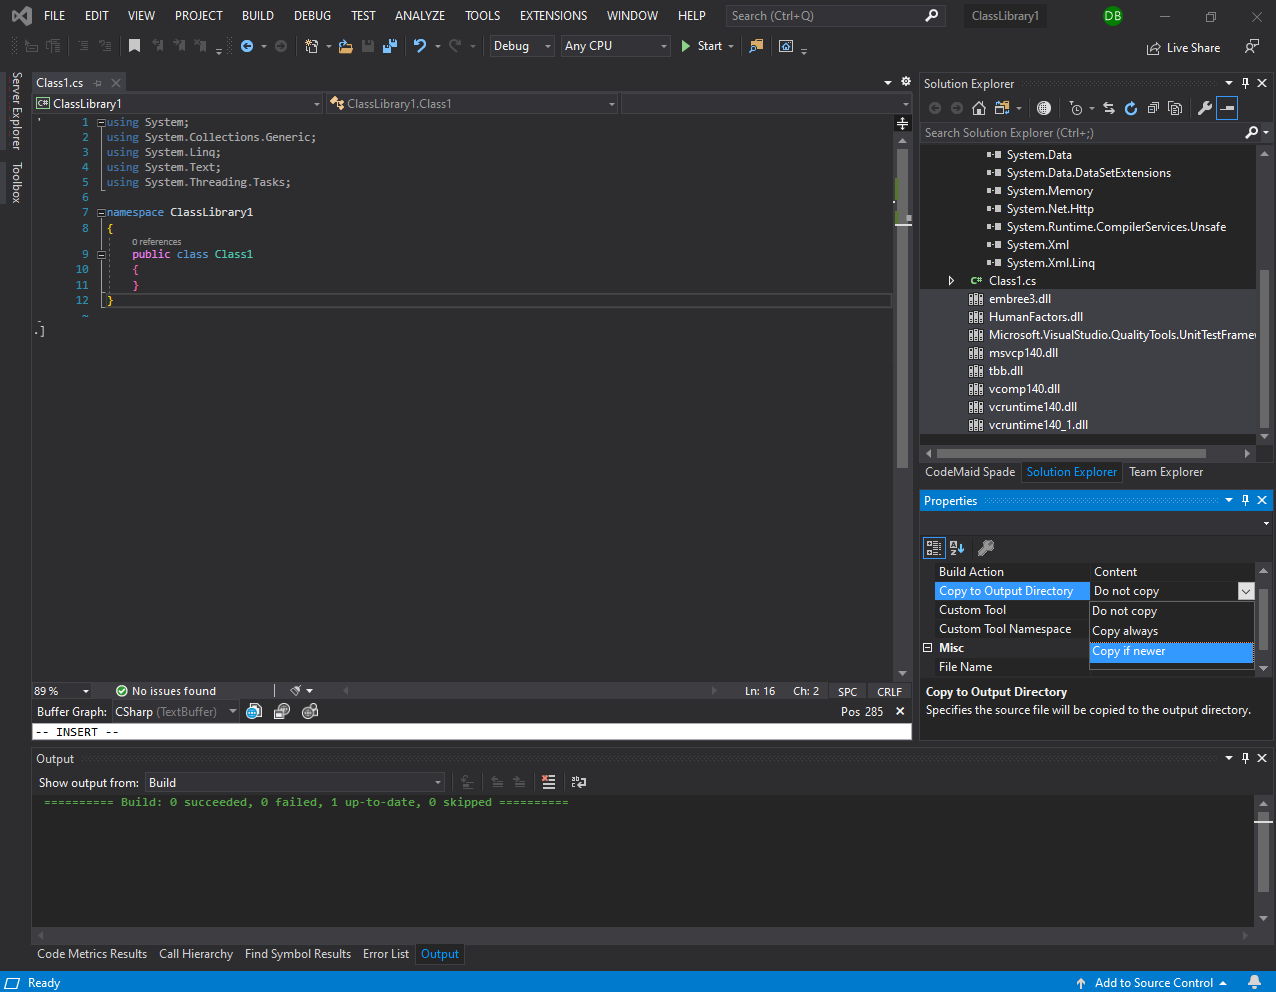
Figure 3.7: Changing Do Not Copy to Copy If Newer
Once you click on Do Not Copy you should see a drop down appear to the right. Click on the downward arrow to expand it then select Copy If Newer like in Figure 3.7. Upon clicking this the option should also change to Copy if Newer. Now upon building the program, these files should be copied to the output directory alongside your library and all of the C# references.
Ensuring Files are Properly Placed in the Output Directory
With everything set up correctly, we should now be able to demonstrate that this process works. The goal is to ensure Visual Studio can see the referenced C# code, and that it copies all of the dependencies to the output directory once the project is built.
under the line using System.Threading.Tasks enter the following using declarations.
Then in the body of the default class Class 1 Enter the following line.
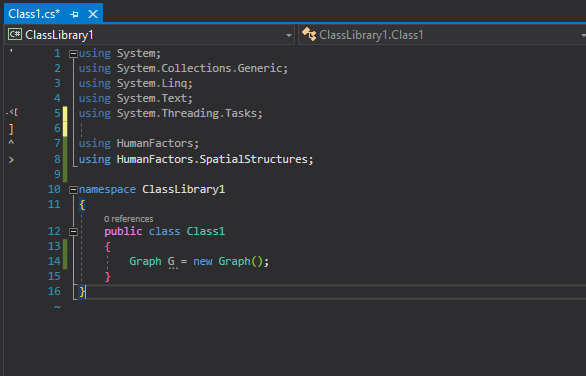
Figure 4.1: Added Example Code
Once you've done this your code should look like Figure 4.1
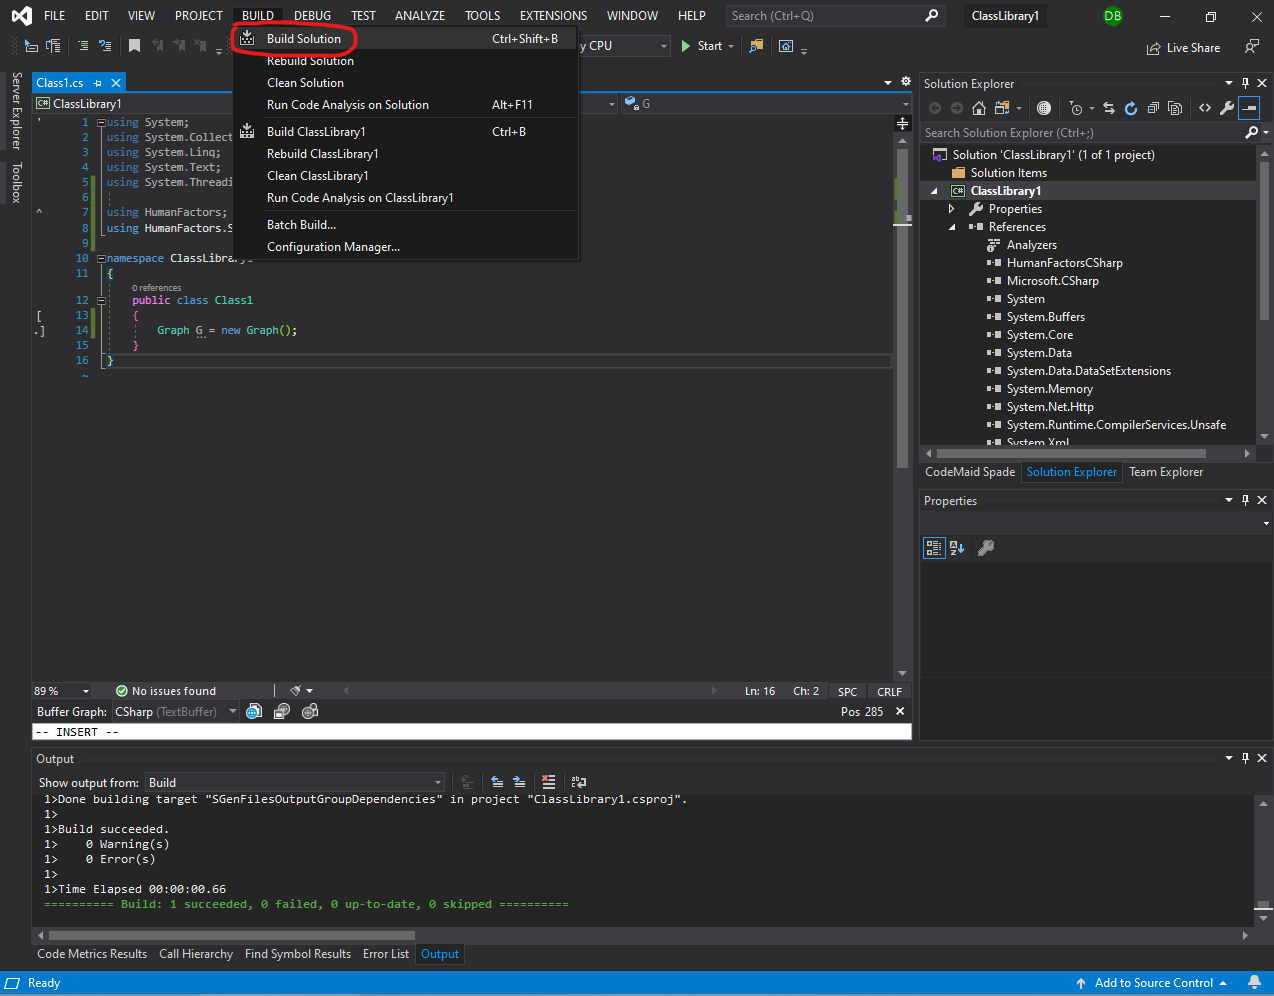
Figure 4.2: Building the project
After verifying that your code matches Figure 4.1, In the top bar of Visual Studio click Build and then click Build Solution. This will compile the C# code we have written into a DLL and put it in the output directory alongside all of the required dependencies. We will now navigate to the output folder to ensure this is true.
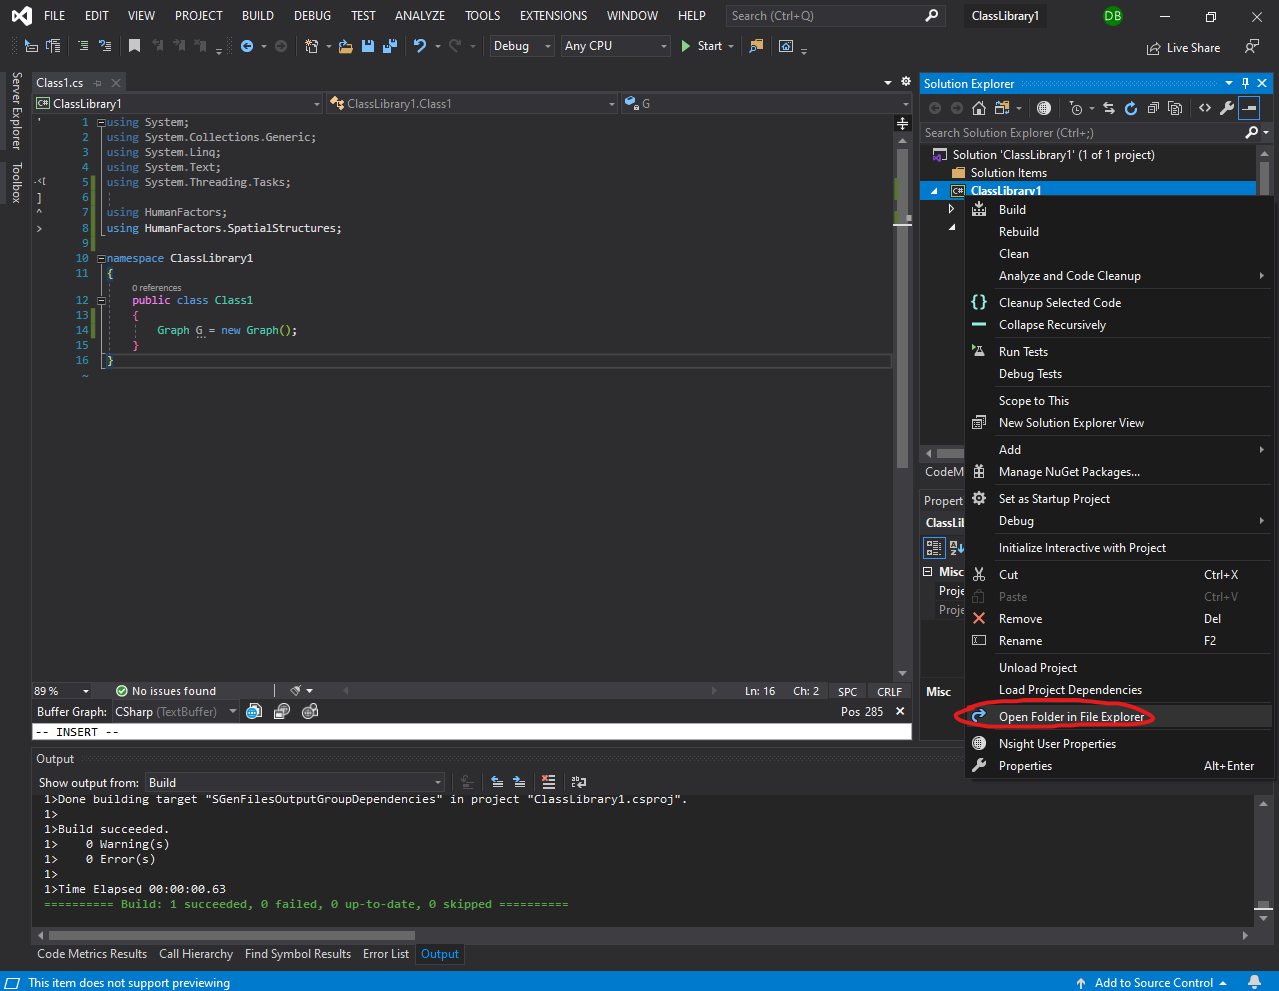
Figure 4.3 : Open in file explorer
Right click on your project in the solution explorer, and click open in File Explorer.
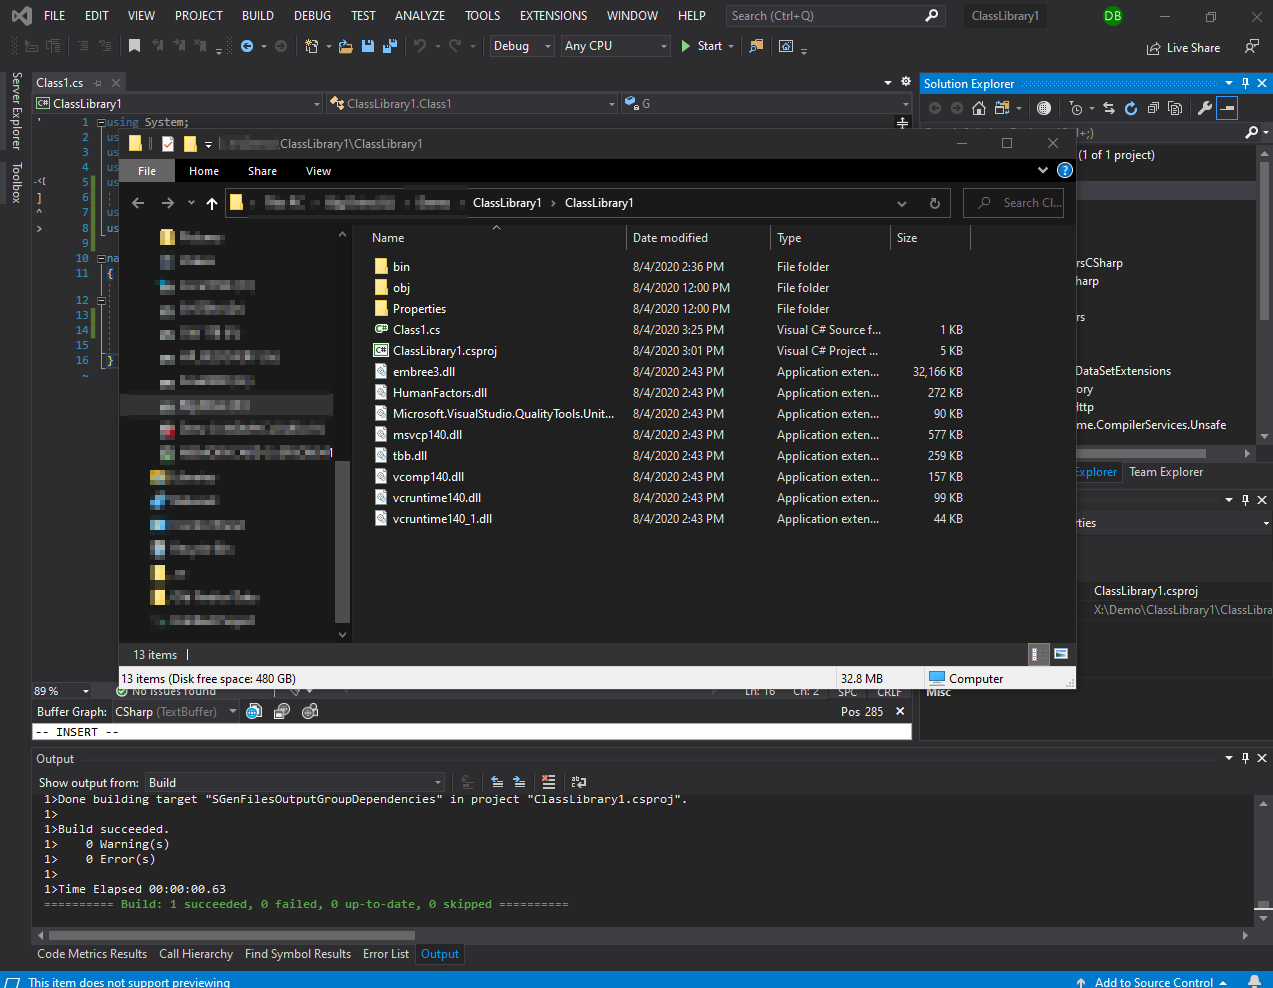
Figure 4.4 : Solution in file explorer
This should open an instance of the file explorer at the root of your project like in Figure 4.4. From here, navigate into the bin then Debug folders.
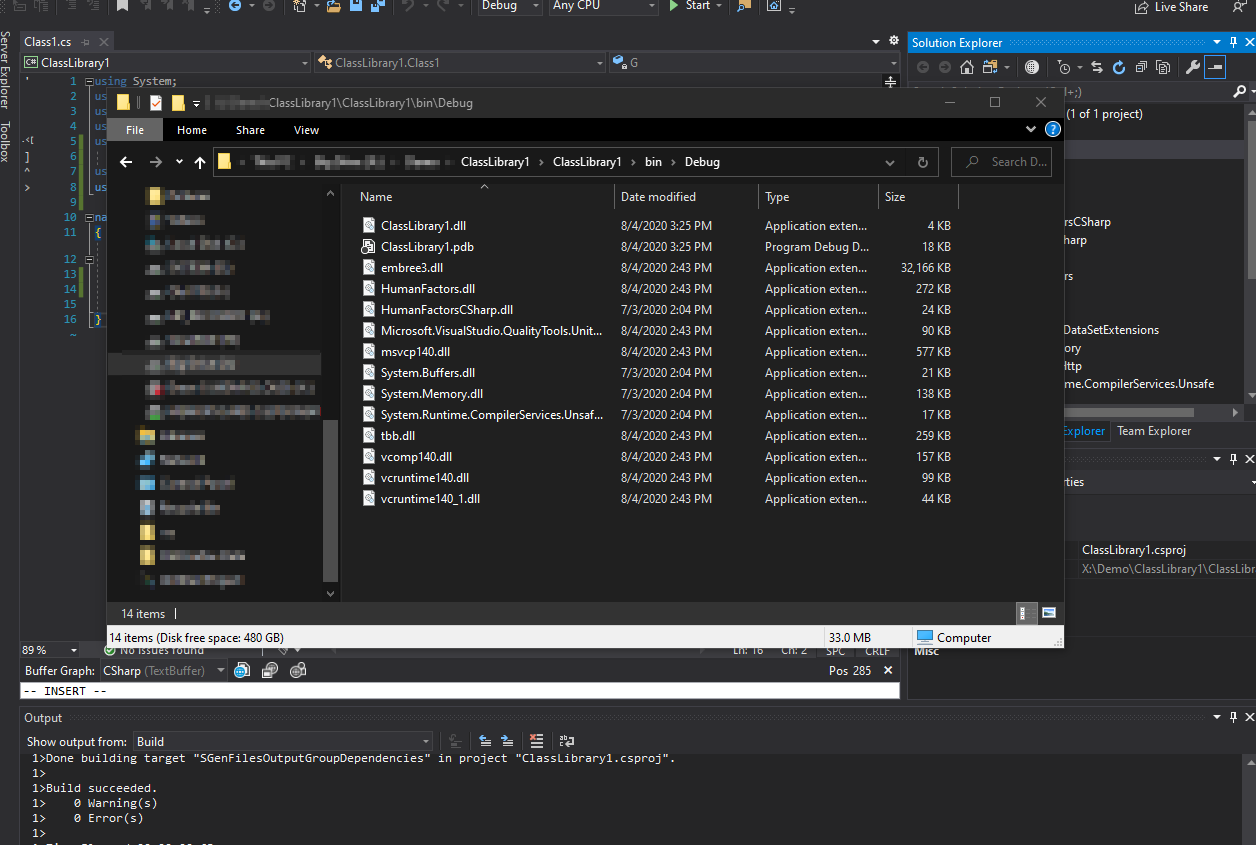
Figure 4.5 : Contents of the Debug Folder
Once there, you should be looking at the output of your program. Verify that all of the C# and non-C# DLLs that we've added have been copied over successfully. Now that this is the case, we're ready to move onto testing that this DLL works.
Testing the Interface
To demonstrate this DLL is functional, we will attempt to load the mesh data of an obj file from disk. In this tutorial I will be using a simple plane titled plane.obj however, this should work with any OBJ file so pick one of your own that you'd like to use with DHARTAPI.
Create a Console Project
Since we created a C# library, we cannot run it in order to produce output. In order to test our library, we will create a second project that links with our library to execute some of its code.
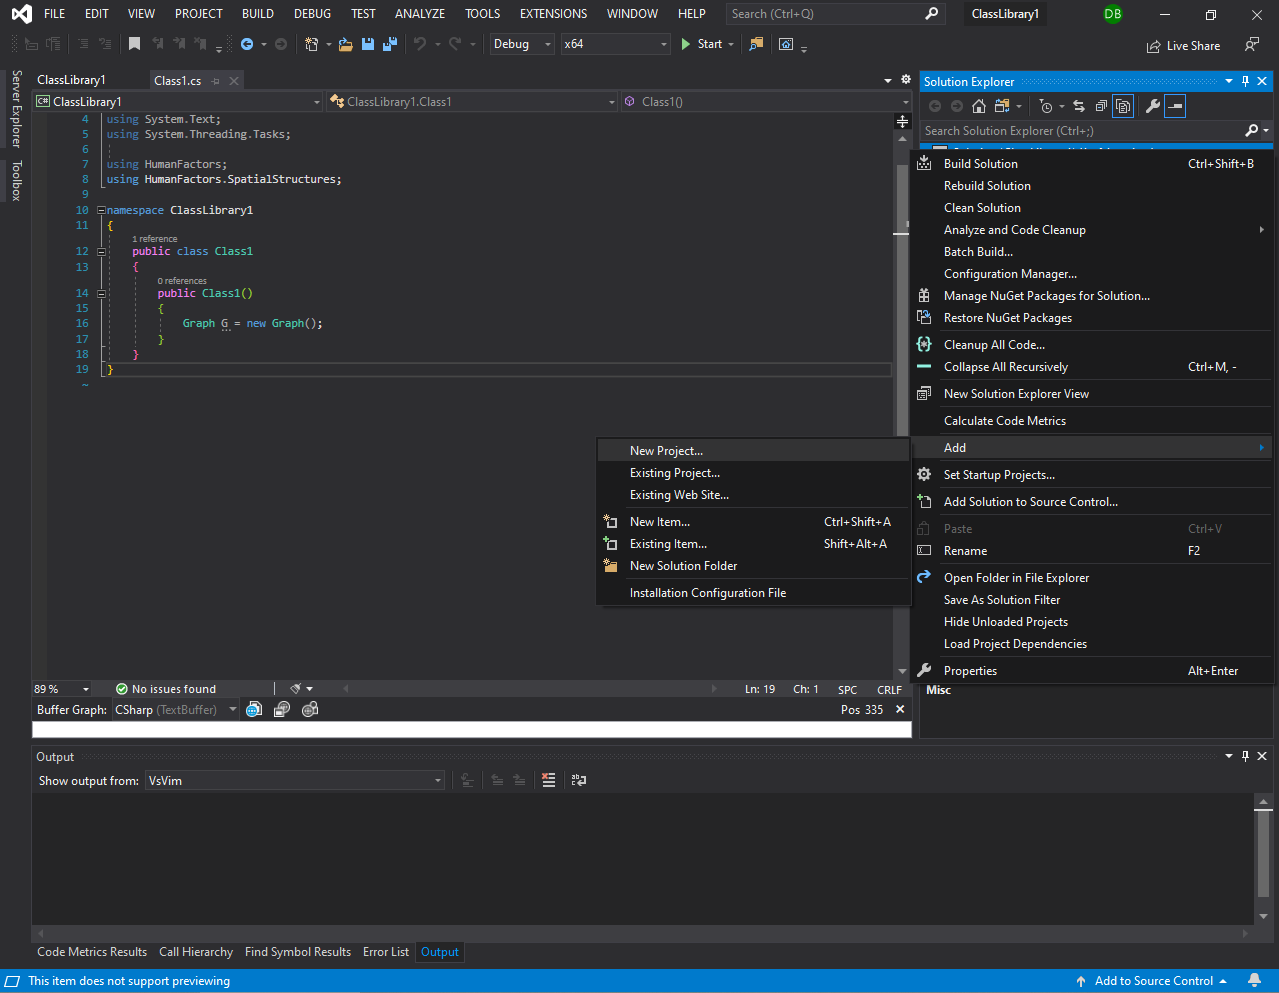
Figure 5.1.1 : Add new project menu
To add a new project right click on the solution in the solution explorer, hover over add, then click New Project as shown in Figure 5.1.1.
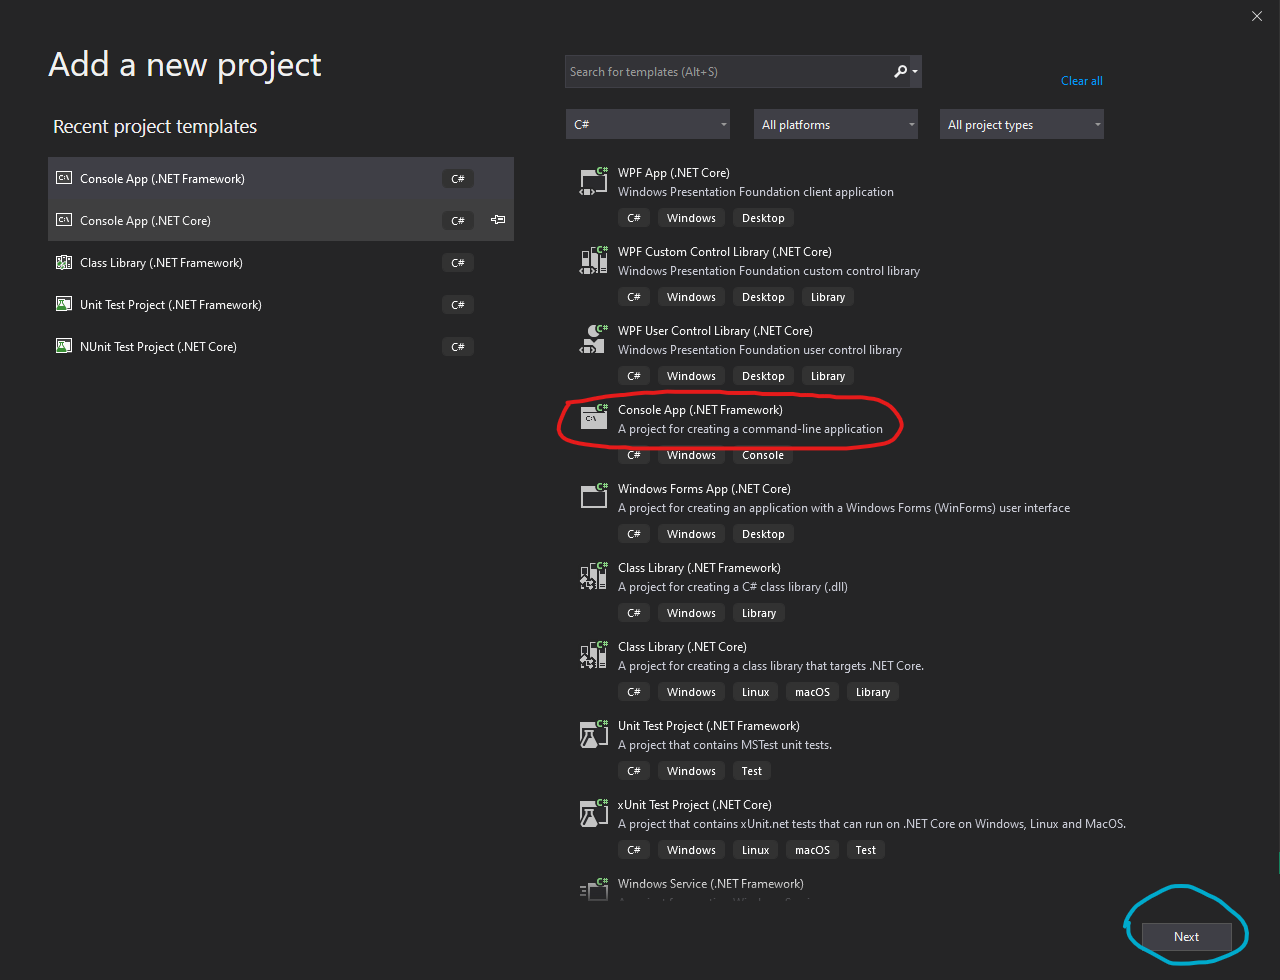
Figure 5.1.2 : New Project Dialog
Like in the previous time we used this dialog, the contents of your new project screen may not match this tutorial's due to differences in what Visual Studio extensions you have installed. Scroll down until you see Console app (.NET Framework), circled in red in Figure 5.1.2. Click on this option, then click on the Next button in the bottom right, circled in cyan in Figure 5.1.2.
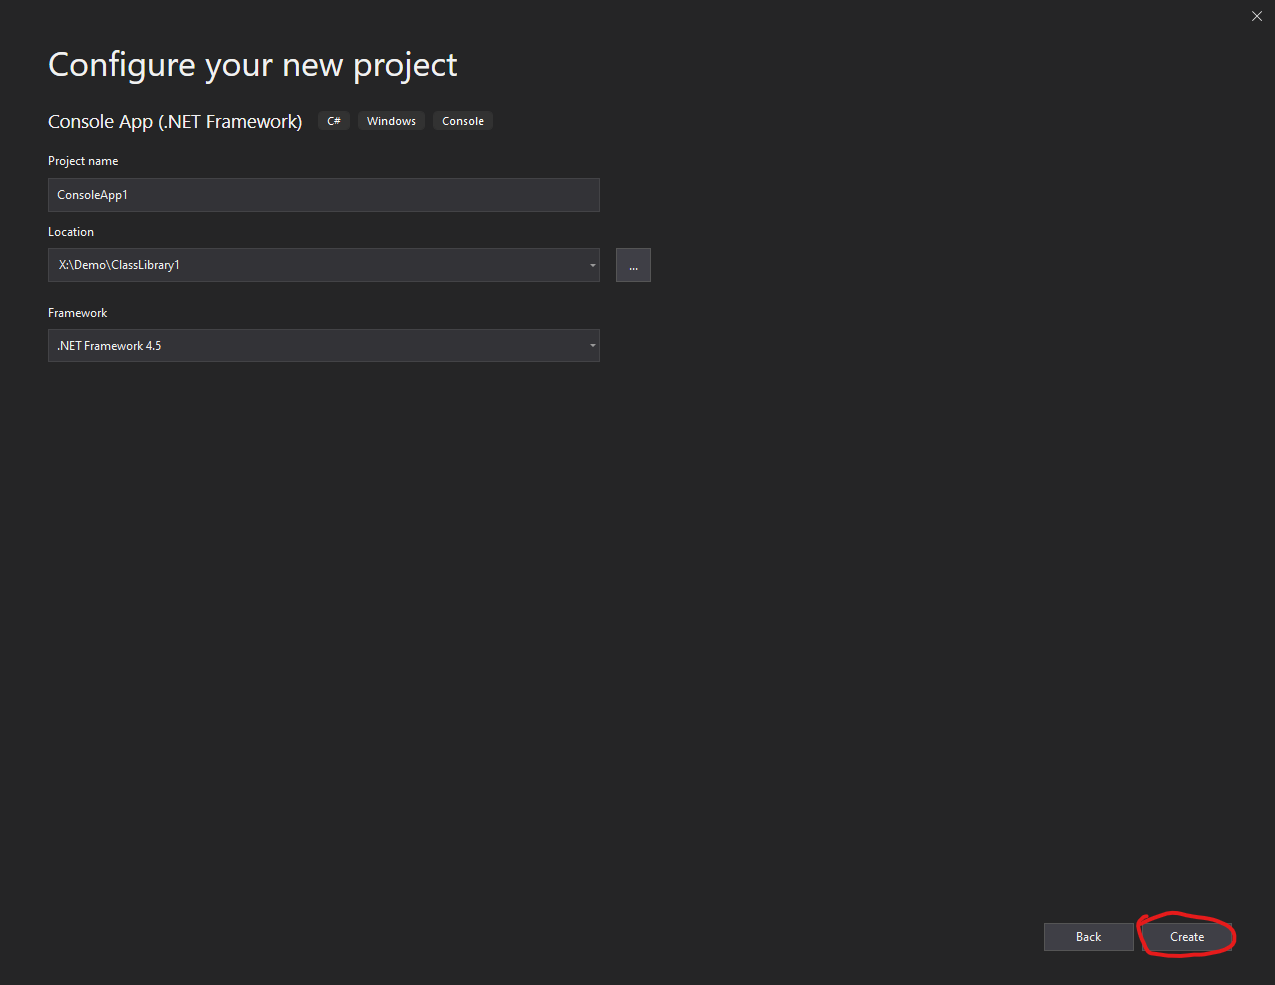
Figure 5.1.3 : New Project Dialog
After clicking next you'll be brought to the conFigure screen. Nothing should need to be changed here, so just click the create button in the bottom right.
Figure 5.1.4 : Blank console project
After that is complete, you should be brought back to Visual Studio with the new console project in your solution explorer (highlighted in 5.1.4). IF this is the case then we're ready to move onto writing to code to load an obj file.
Writing Sample Code
Now that we have a console project that we can execute, we'll go back to our library and write the code necessary to load an obj file.
Figure 5.2.1 : Blank console project
Go back to the .cs file we made in the previous section and double click on it to open it. In this fill we will modify Class1 to be static, then give it a function titled SampleLoadOBJ().
Before moving further, add the lines using DHARTAPI.Geometry; and using System.Diagnostics; to your block of using declarations. After adding that line, add the word static after the word public on line 12. This will make it so we don't need to instantiate a new instance of the class in order to run the function we want. After doing this, the editor will show an error with the code we wrote previously. Delete the body of that function, leaving the space between the open and closing braces of Class1 empty.
Figure 5.2.2 : Blank console project
At the end of this process, the entire file should contain only the above code, also shown as a picture in Figure 5.2.2. Now with the body of the class empty we will add a new function public static void SampleLoadOBJ(). Write the following into your editor in the body of Class1:
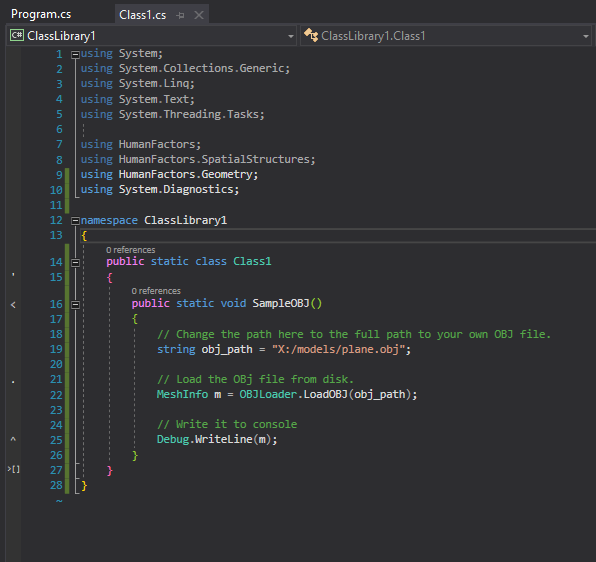
Figure 5.2.3 : Full code with obj sample loader.
Make sure your code matches before progressing.
Important: You must change the path obj_path to be the path from the downloaded plane.obj file.
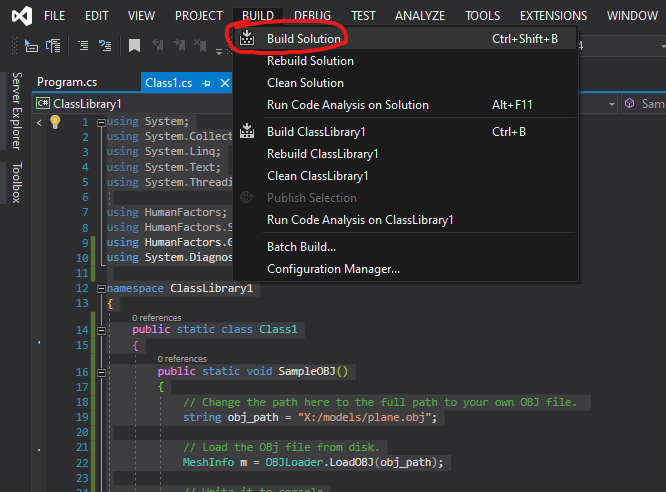
Figure 5.2.4 : Building Solution
Once you're sure your code matches, build the project by going to build > build solution. This should build without errors. If this is the case, you have added the sample code successfully and are ready to write the command line application to call it.
Adding a reference to the library from the Console App
In this section we will add the necessary code to the command line application to call the code we just wrote. Despite being in the same solution, we need to explicitly add a reference from ConsoleApp1 to ClassLibrary1 before we can use the code from it.
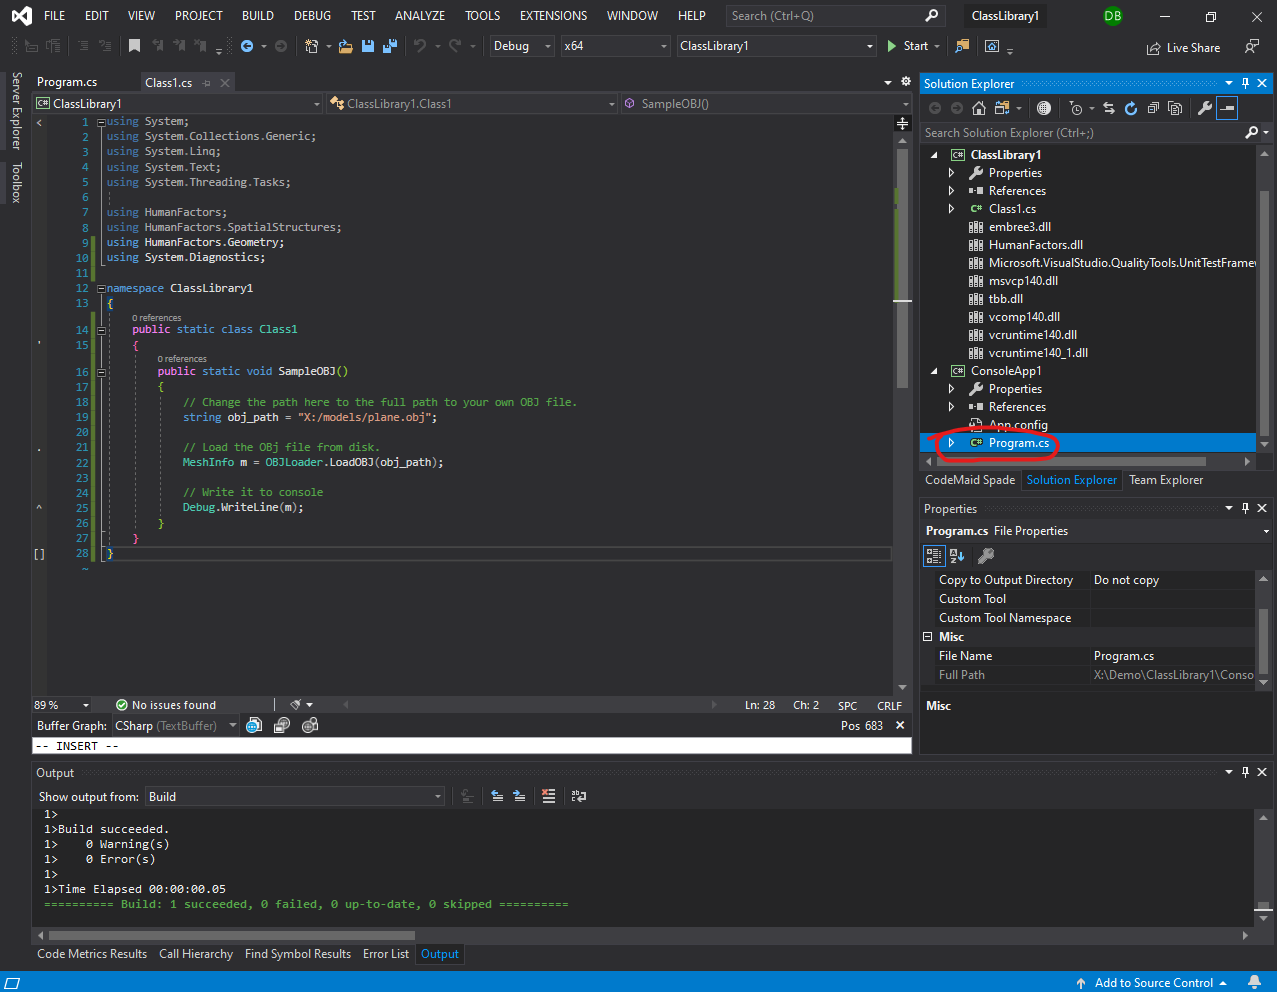
Figure 5.3.1 : Change to Program.cs
Go to the solution explorer and click on Program.cs under the ConsoleApp1 Project as shown in Figure 5.3.1.
Figure 5.3.2 : Program.cs Blank
Before we can reference the other project, we must first add a reference to it, similar to how we added a reference to the DHART_API.dll in the second section of this tutorial.
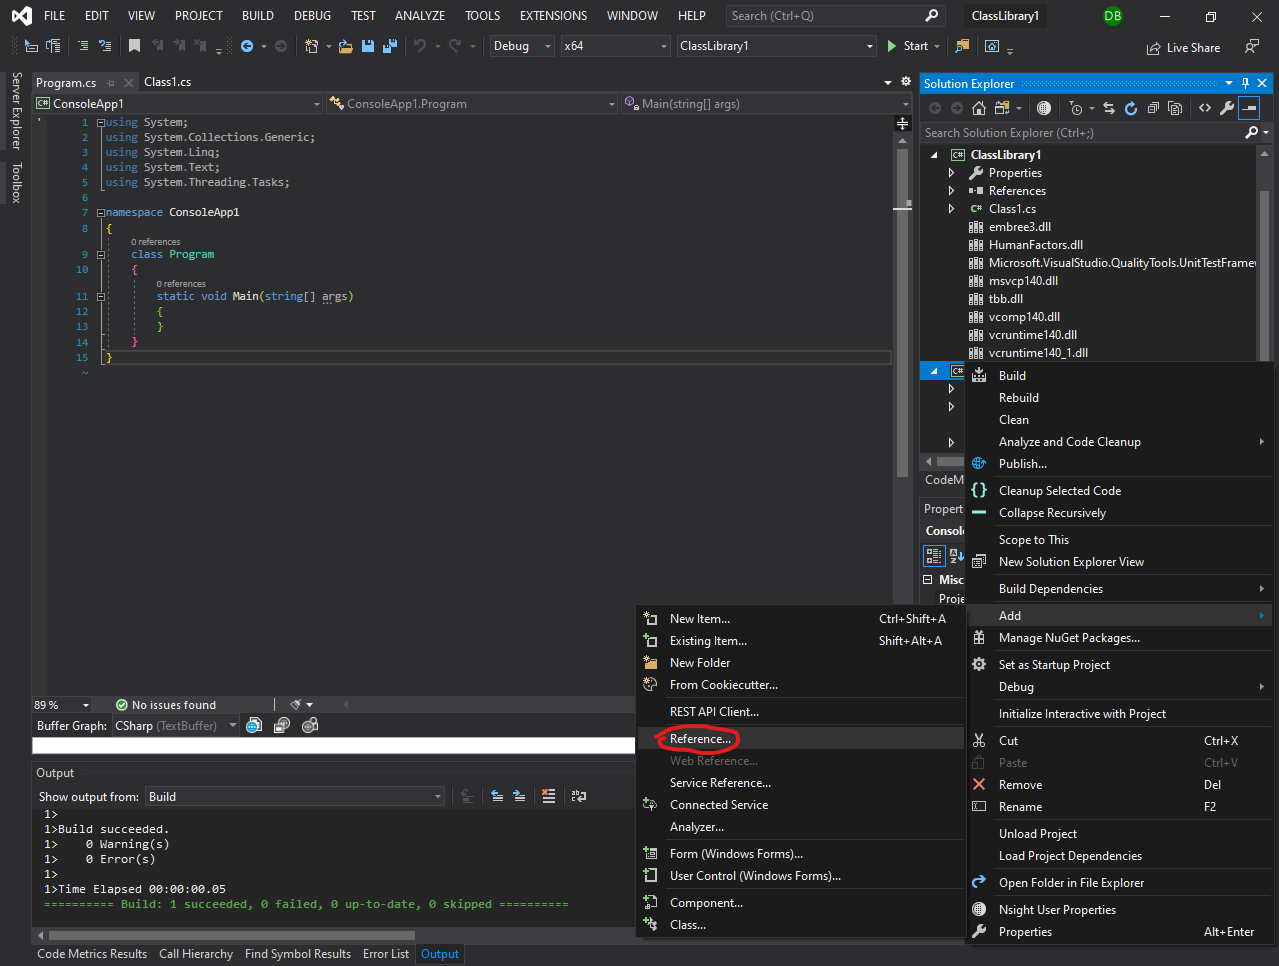
Figure 5.3.3 : Add reference menu for ConsoleApp1
Right click on ConsoleApp1 in the solution explorer, hover over Add then CLick Add Reference like shown in Figure 5.3.3.
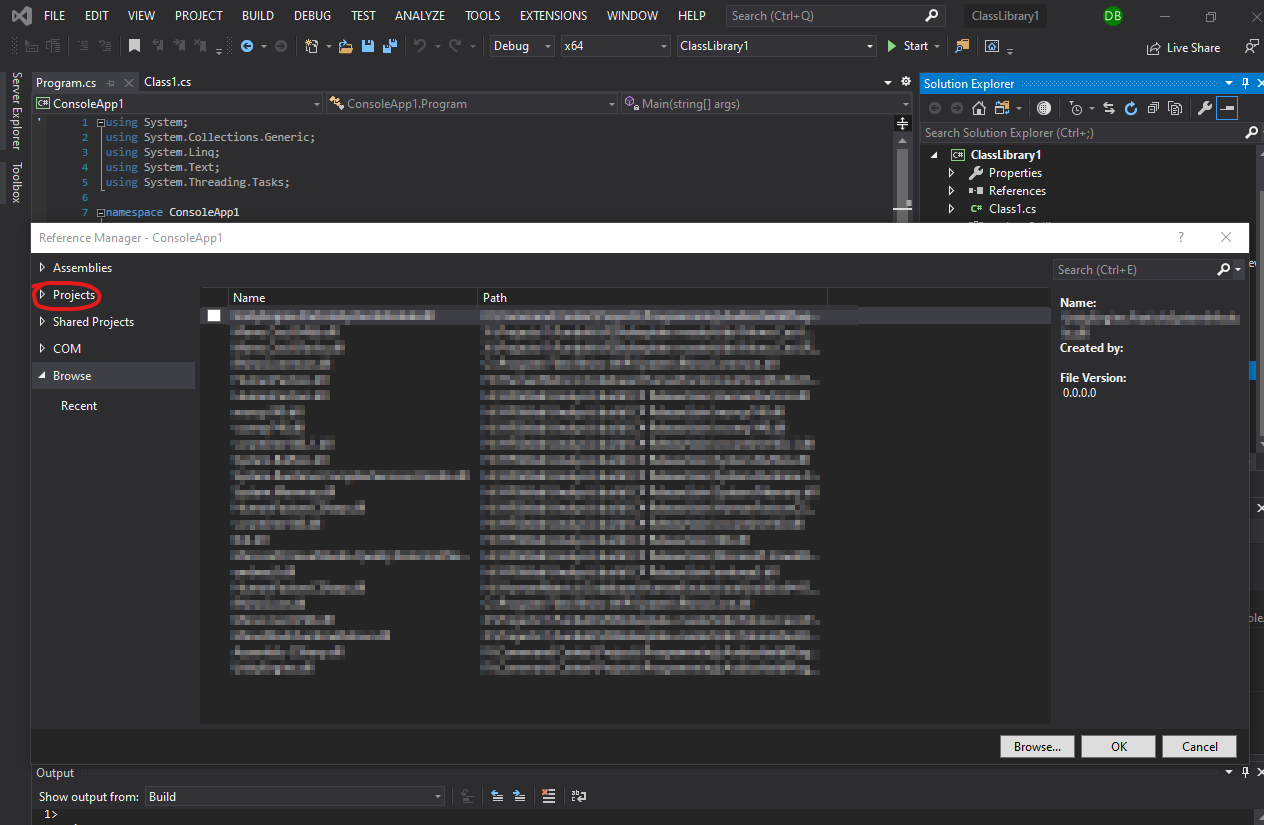
Figure 5.3.4 : Circled: Projects tab in the reference manager
Doing so will open the reference manager. For this case, we want to add a reference to another project, not an external DLL, so we'll need to go to the projects tab in the left sidebar, circled in Figure 5.3.4.
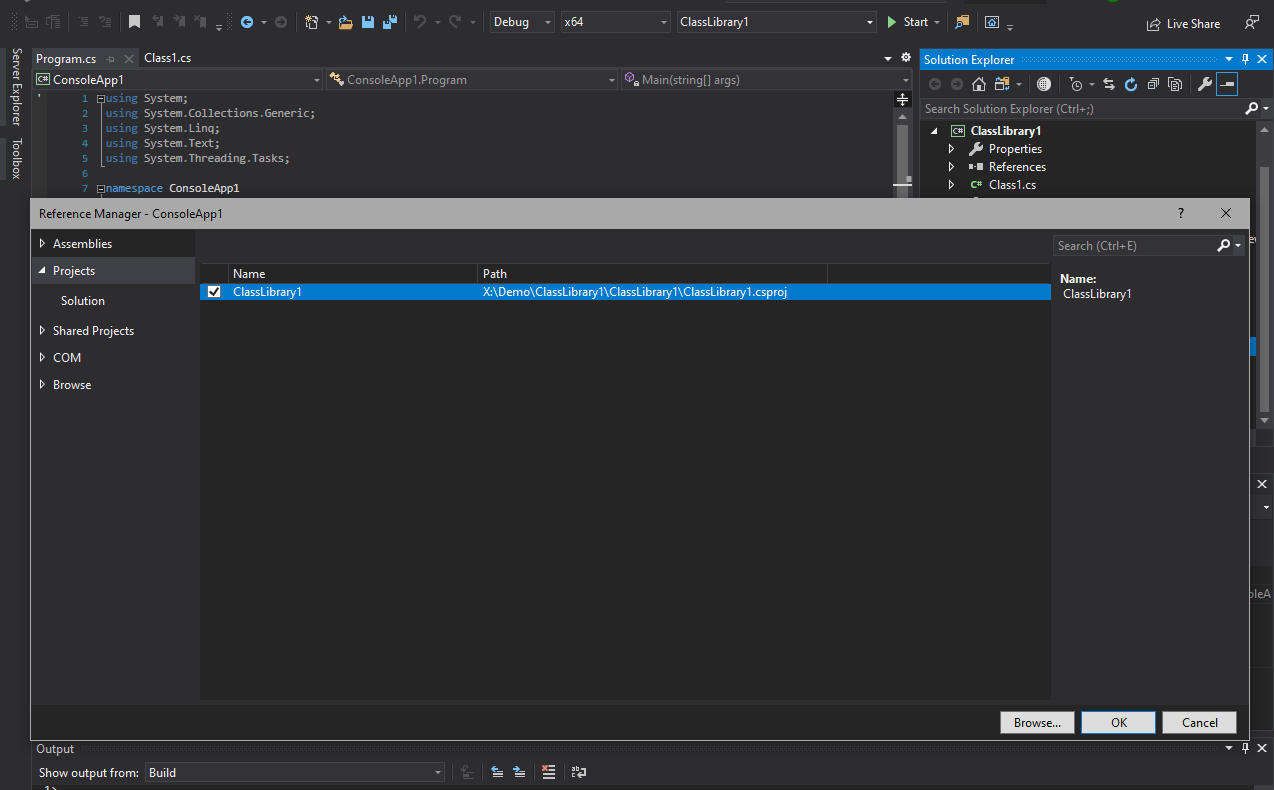
Figure 5.3.5 : Reference Manager Projects Section
Now, in the projects tab, check off Class Library 1 to mark it as a reference and click the OK button in the bottom right corner of the reference manager.
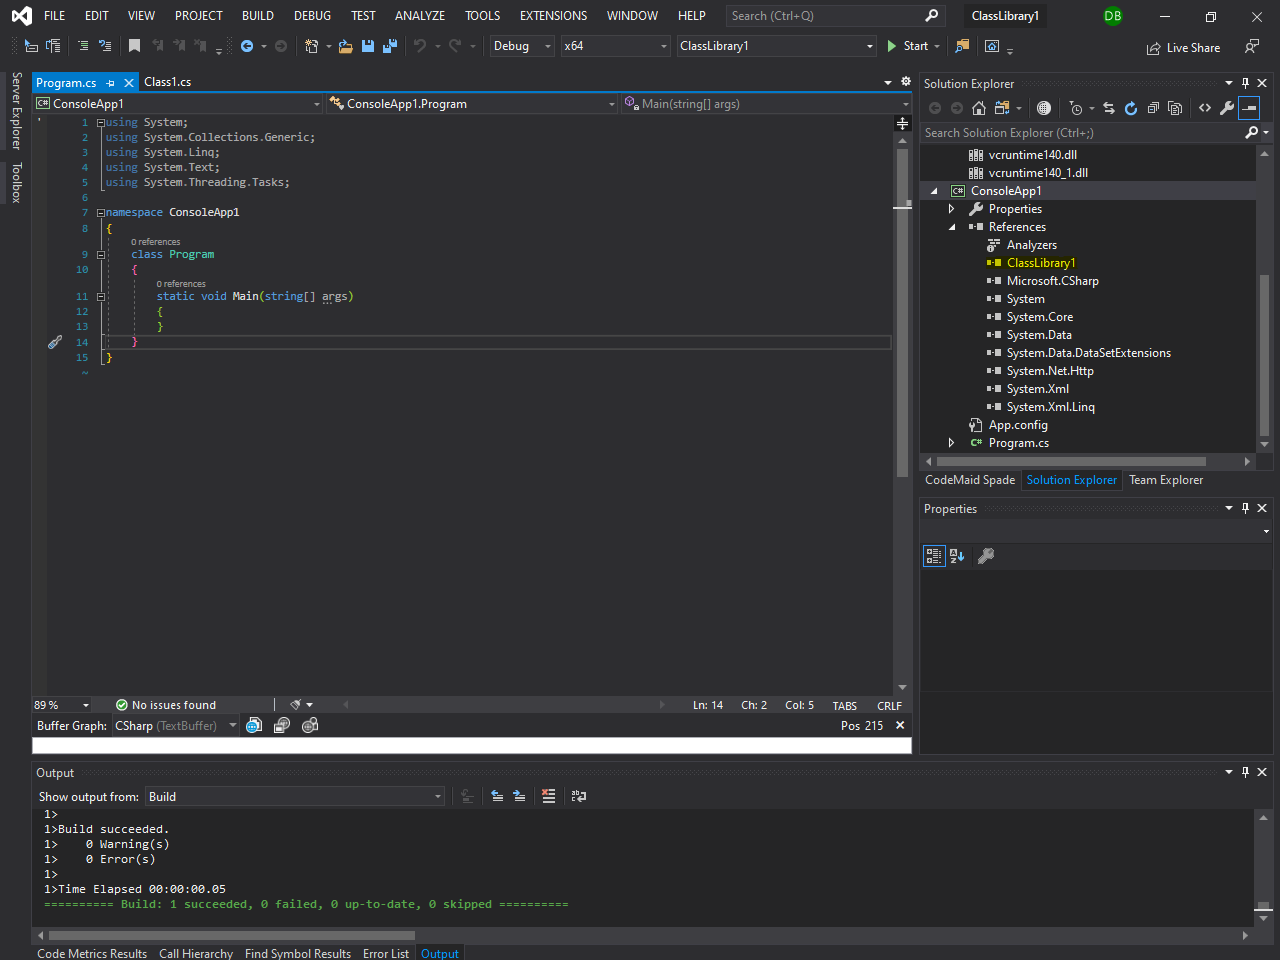
Figure 5.3.6 : Highlighted: Class Library 1 in in the references of ConsoleApp1
After pressing OK, you should see ClassLibrary1 in the references of ConsoleApp1 like highlighted in Figure 5.3.6. If you see this, then you're ready to move on to writing the code for the command line application.
Writing And Executing the Command Line Application
Now that the console project can reference our library, we will write some code to call the example function we defined.
Figure 5.4.1 : Default contents of program.cs
You should still have the code from Program.cs open like in Figure 5.4.1. From here we're going to add the following line to the static void Main() function:
ClassLibrary1.Class1.SampleOBJ();
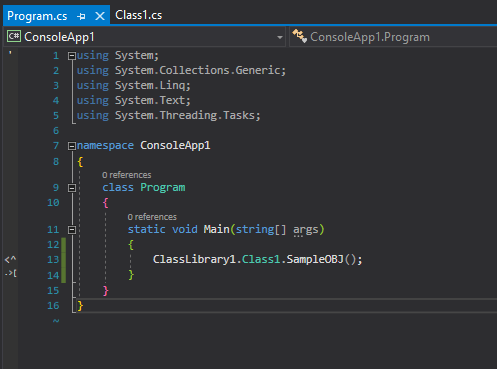
Figure 5.4.2 : Default contents of program.cs
After doing this your code should look like this. Once again, build your solution, and ensure that it builds successfully. This is all the code that is required to test this tutorial and we are ready to test it.
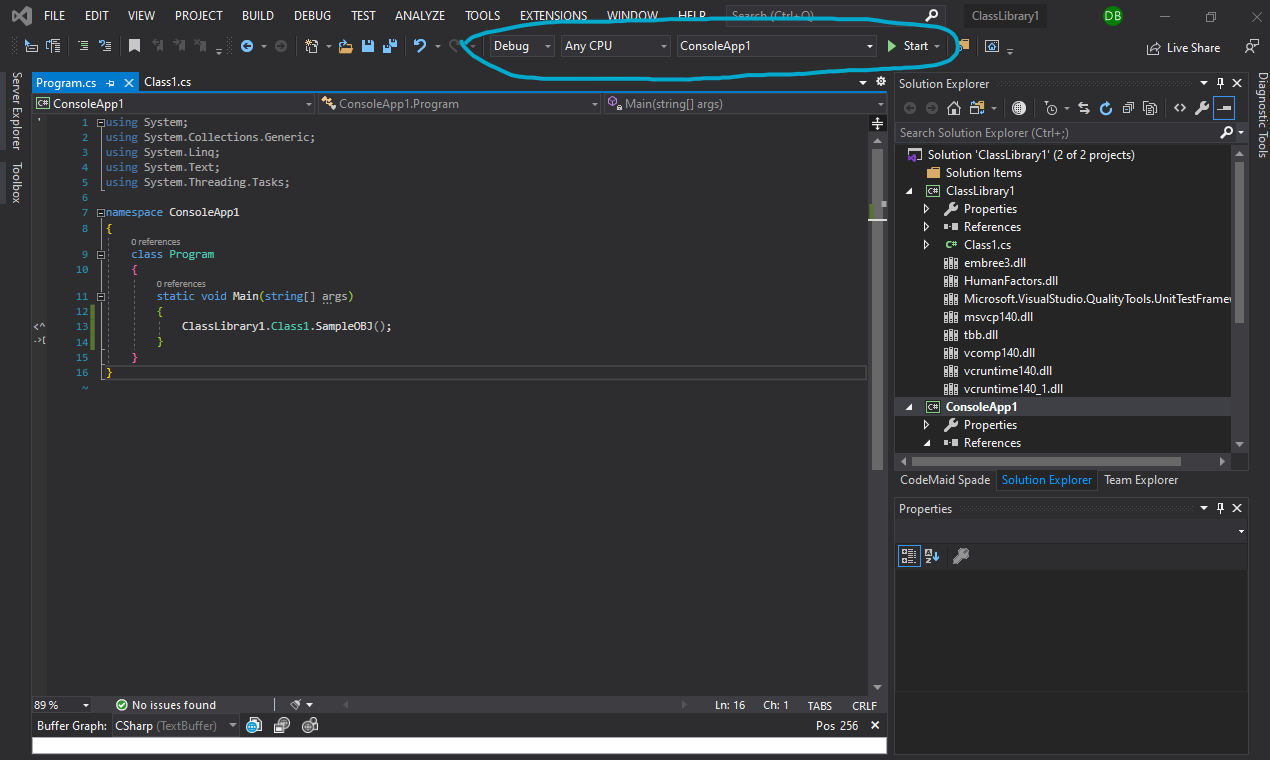
Figure 5.4.3 : Debug Toolbar Circled
Look at the debug toolbar right of your Visual Studio window, circled in Figure 5.4.3. You press the Start button to debug your program, however the option may default to ClassLibrary1 instead of ConsoleApp1. To solve this, click on the dropdown that says ClassLibrary1 and change it to ConsoleApp1 like in Figure 5.4.3. There is one more step before we can run the program, and that is to ensure that both ConsoleApp1 and ClassLibrary1 are built as 64 bit applications.
If you do not see the "ConsoleApp1" type dropdown at all, it is okay and could just be a layout issue. To continue with this anyway, make sure you:
- Right click on the Solution in Solution Explorer and building the solution (not just a subproject).
- Select the solution and rightclick or view Properties. Change
Startup projectitem toConsoleApp1.
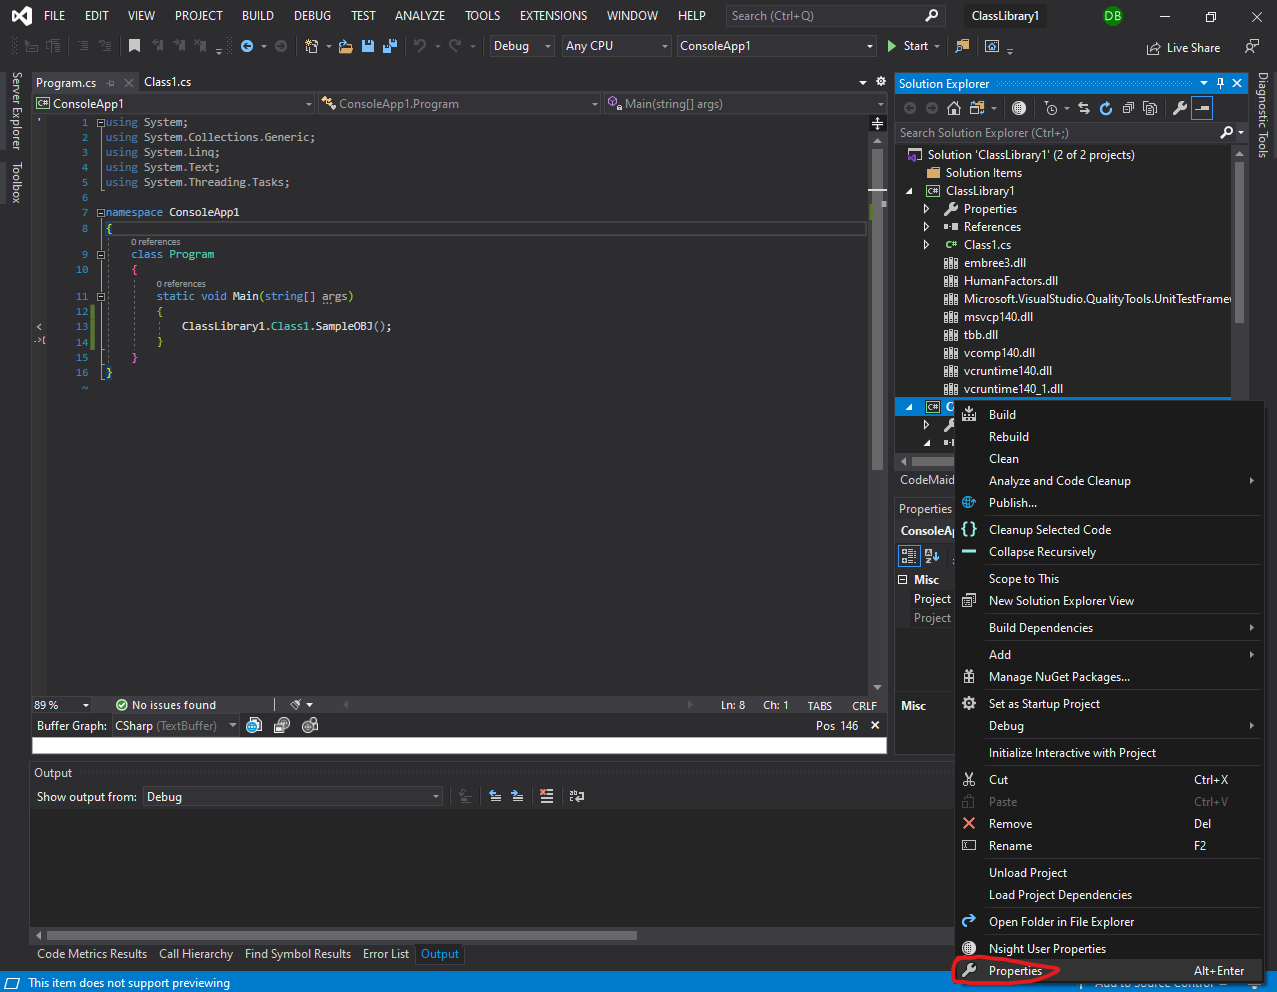
Figure 5.4.4 : ConsoleApp1 Properties Menu
Right click on ConsoleApp1 in the solution explorer and click Properties, like in Figure 5.4.4.
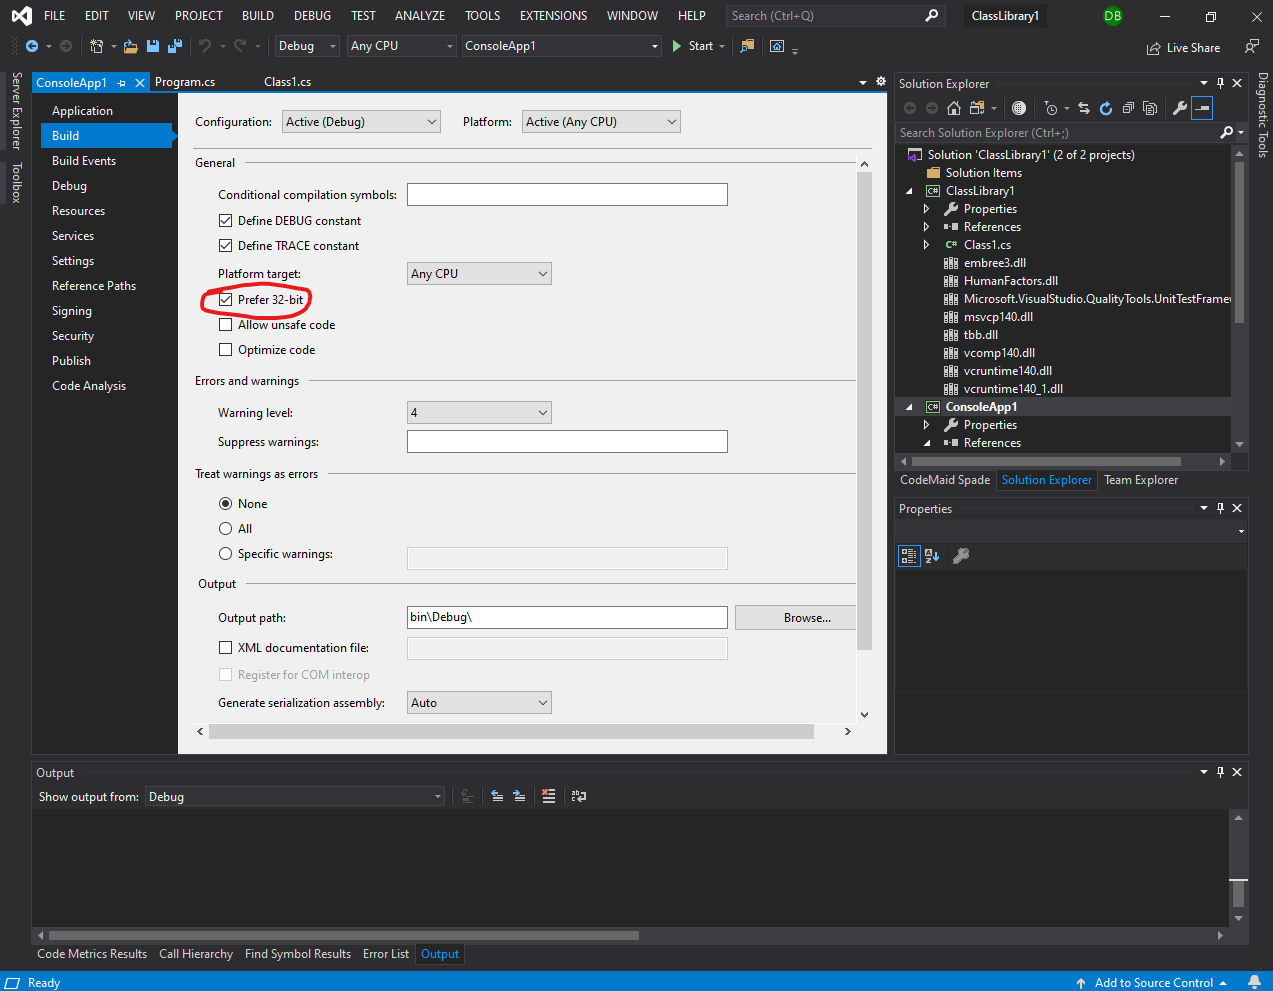
Figure 5.4.5 : ConsoleApp1 Properties Tab
Now you should be brought to console app 1's properties like in Figure 5.4.5. Here you can see that the option Prefer 32 bit is checked. We want to disable this option by unchecking the checkbox and changing Platform Target to x64.
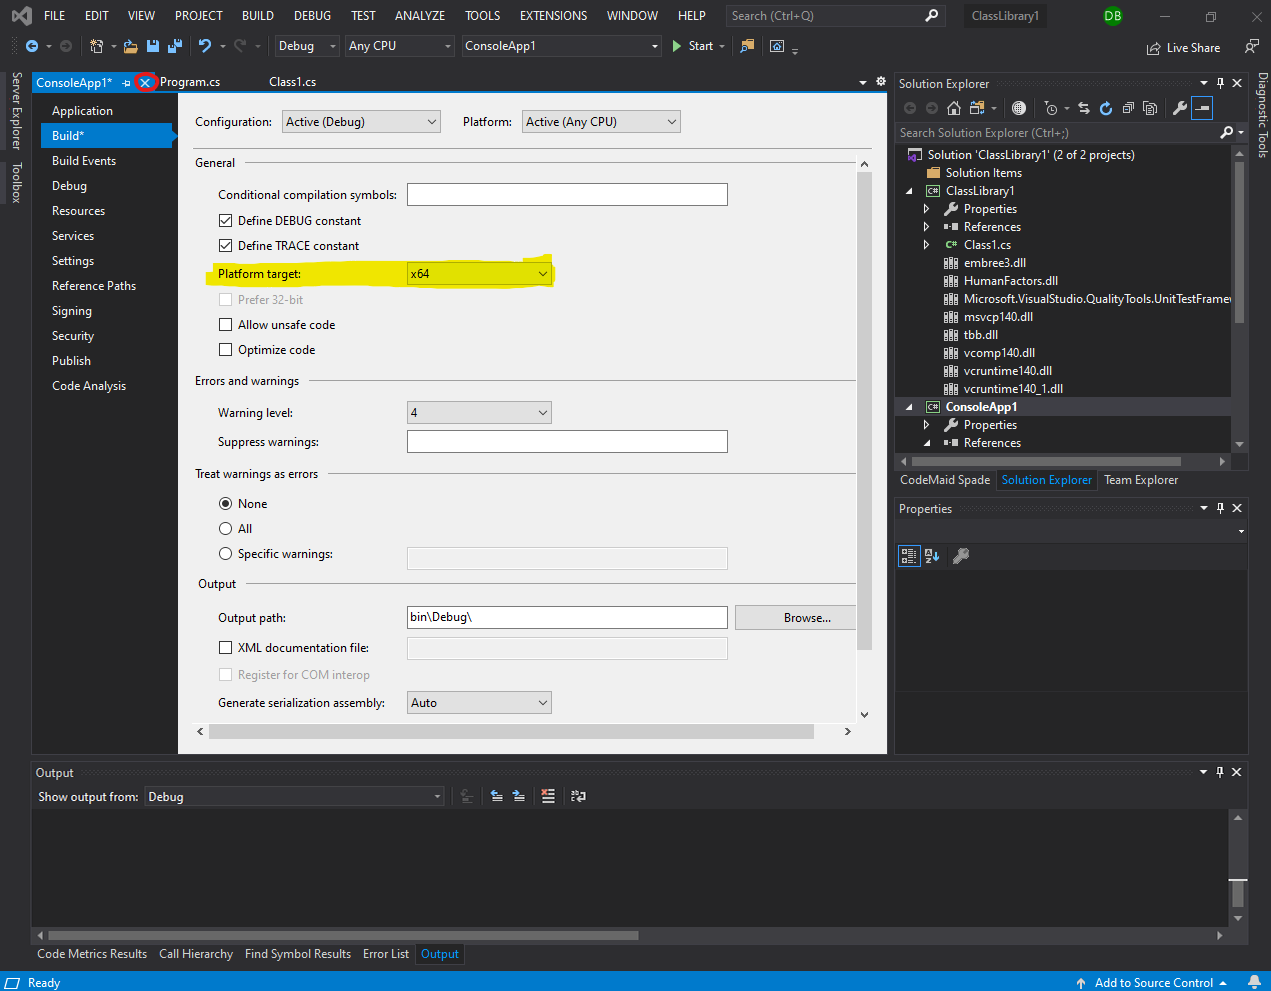
Figure 5.4.6 : ConsoleApp1 Properties Tab
Once you've done this, the window should match that of Figure 5.4.6. Once you're sure of this press Ctrl + S to save the changes, then press the X next to the console app 1 tab, circled in red. Ensure there is no asterisk next to the name of the tab before doing this, as that indicates unsaved changes. Once closed this will return you to the program.cs window. Repeat this process for ClassLibrary 1 to ensure that it is also 64 bit before proceeding.

Figure 5.4.7 : Circled Start button
Now finally, click the start button circled in Figure 5.4.7 to test the program.
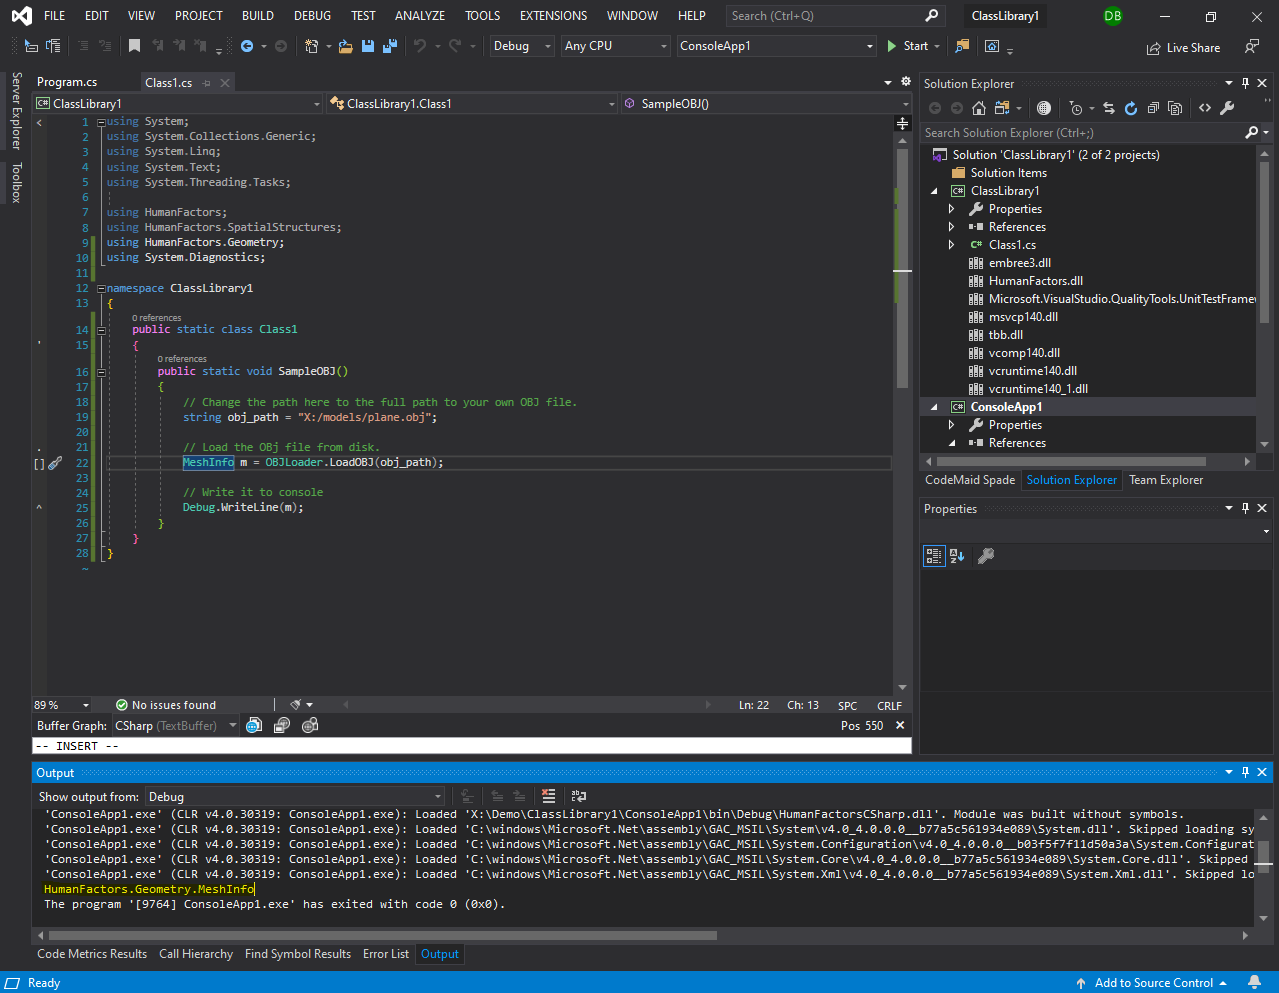
Figure 5.4.8 : Successful Output Highlighted
Upon clicking start, you should see a console window appear briefly, then close. Look in the output at the bottom of your Visual Studio window. You should see the line DHARTAPI.Geometry.Meshinfo. IF this is the case then you have successfully created a project using Humanfactors to load an obj from disk.
The exact output may vary (such as saying EntireFile, ID:0, Verts: 4, Triangles: 2), but as long as there is no error it is a good sign.