Table of Contents
CMake Install Step Guide
Prerequisites
This tutorial requires knowledge of topics covered in the CMake tutorial on the main page. If you have not yet completed that tutorial at least once, go through it before continuing here.
Intro
When you generate a CMake project, CMake will populate the build directory with all the files necessary to build the project using the selected build system. Since each build system uses a different file structure, the placement and creation of all content in the build directory is our of our control (we do copy some files into build directories for testing purposes). For example, Ninja uses a different directory structure than a Visual Studio project.
With this in mind, how do we get useful output from building our program if we don't know the output directory? The solution: CMake's Installation Step.
Instead of using the build directory folders as our project's "output" we use CMake's install command to build the project then create and organize an output folder so it's ready to be distributed without any need for manually copying or moving files. In this tutorial we'll walk through the process for installing DHARTAPI from projects generated by the Cmake-Gui and installing directly from the project folder itself using Visual Studio.
The Install Step
Depending on what type of project you have, follow either the Open Folder Project or CMake GUI sections.
Open Folder Project

Figure 1.1: Solution Explorer for a Visual Studio Open Folder project
Open Folder means you're operating directly on the CMake directory itself using Visual Studio instead of using the cmake-gui to generate a Visual Studio Project.
Set Install Directory And Settings
In an open folder project, the default install directory is out/install. If you are fine with the default directory, then you can move onto the next section.

Figure 1.2: Highlighted: CMake Settings json file
If you would like to install to another directory, then Double click on CMakesettings.json in the root of your project to open the CMake settings window.

Figure 1.3: Highlighted and Circled: Show Advanced Settings
Scroll to the bottom then click on Show Advanced Settings to expand the advanced settings.

Figure 1.4: Highlighted: Install directory textbox
First under advanced settings, make sure that your options under the Value column match the ones in Figure 1.4 before continuing. You can use either the debug or release configuration, but remember that it will affect which dlls are output once installed. After you've verified your settings match, enter the path you want to use in Install Directory or click the button to the right of the textbox to select it from a file explorer menu.
Save your changes by pressing Ctrl + S then close the CMakesettings.json window. Now we will install the project.
Build/Install

Figure 1.5: Circled: Install submenu
In the toolbar at the top of your screen left click on the Build button then left click the Install DHART_API option. Visual studio will now automatically build and install the CMake project.

Figure 1.6: Output of running the install step on a debug with no modifications to the install path.
The contents of your project should now be built and installed to the location you specified in the install section. If you left the default, then it will be installed to out/install/x64-Debug for the debug build or out/install/x64-Release for the Release build
Verifying Output
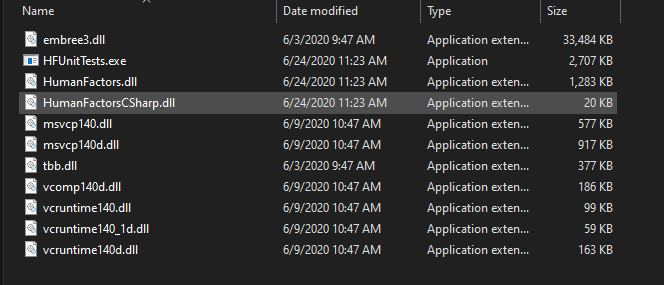
Figure 1.7: Contents of the Debug bin directory.

Figure 1.8: Contents of the Release bin directory.
To verify that the install step was completed successfully, open the bin folder in the directory you've installed the project to. The contents of the bin directory should match those shown in Figure 1.7 or Figure 1.8 depending on whether you used the install or release builds. If this is true, then you've successfully performed the install step for DHARTAPI. If the contents don't match, make sure that your settings for the project you used exactly match those stated in the tutorial then try again.
CMake GUI

Figure 2.1: cmake-gui project output with INSTALL target highlighted
This assumes you've already generated the Visual Studio project with the CMake GUI using the guide from the mainpage. Your solution explorer should look similar to that shown in Figure 2.1, however you have more or less targets depending on the settings you generated the project with. Right now the only target that is relevant is the INSTALL target.
Set Install Directory And Settings

Figure 2.2: Highlighted: CMake Install Prefix
The generated project's install directory is set by the CMAKE_INSTALL_PREFIX variable in the CMake GUI. You can modify this by double clicking on the path and entering the path to the folder you want to use as output. For this tutorial we'll install the project into a new folder in our Documents folder. Ensure that your settings for the options in the DHARTAPI group match those specified in this CMake project. If you've already generated a project, you will need to regenerate the project it by pressing the Generate button as shown in the mainpage tutorial.
Build/Install

Figure 2.3: Visual studio install configuration type drop down.
Before installing the project, take a look at the configuration type being built. This can be manually set by using the standard Visual Studio drop down at the top center of the screen. Remember what setting you have this set to before installing, because it will affect the output.

Figure 2.4: Circled: Build button for the install target.
Right Click on the INSTALL target, then click the Build option.

Figure 2.5: Output of running the install step on a debug with no modifications to the install path.
Just like in open folder walkthrough, the contents of your project should now be built and installed to the location you specified as the CMAKE_INSTALL_PREFIX.
Verifying Output
Figure 2.6: Contents of the Debug bin directory.
Figure 2.7: Contents of the Release bin directory.
To verify that the install step was completed successfully, open the bin folder in the directory you've installed the project to. The contents of the bin directory should match those shown in Figure 2.6 or Figure 2.7 depending on whether you used the release or debug builds. If this is true, then you've successfully performed the install step for DHARTAPI. If the contents don't match, make sure that your settings for the project you used exactly match those stated in the tutorial then try again.